

We are entering a new era of AI, one that is fundamentally changing how we relate to and benefit from technology. With the convergence of chat interfaces and large language models (LLM) you can now ask for what you want in natural language and the technology is smart enough to answer, create or take action.
In the last months Microsoft introduced the concept of Copilot (your everyday AI companion) everywhere and Dynamics 365 Business Central is one of the product affected by the latest AI improvements.
Dynamics 365 Business Central version 23.1 introduces the Copilot Developer toolkit, a set of AL objects to work with Azure OpenAI models and to use the standard Copilot user interface that you will see across all the Dynamics 365 product stack. The module is currently in preview and not fully enabled on the current release, but you can start exploring the code and the new objects.
The new SDK introduces the new PromptDialog page type which allows you to integrate copilot capabilities into your custom scenarios. You can use the PromptDialog page type to create generative AI experiences with the copilot look and feel, which includes signature visuals, and built-in safety controls for customers.
The PromptDialog page has a specific page syntax, which includes new area and action controls.
When defining a PromptDialog page, you need to specify a set of properties. The most importsant is the PromptMode property (by default set to Prompt), which is the starting prompt mode for the Copilot UI.
The PromptMode property can then be changed at runtime via code by using the CurrPage.PromptMode property before the page is opened. Other options for PromptMode can be:
Generate: triggers generating the output of the Copilot interaction.Content: shows the output of the copilot interaction.
The PromptDialog page type has three areas:
Promptarea: is the input area for Copilot and accepts any control, except repeater controls.Contentarea: is the output of Copilo, and accepts any control, except repeater controls.PromptOptionsarea: is the input options, and only accepts option fields.
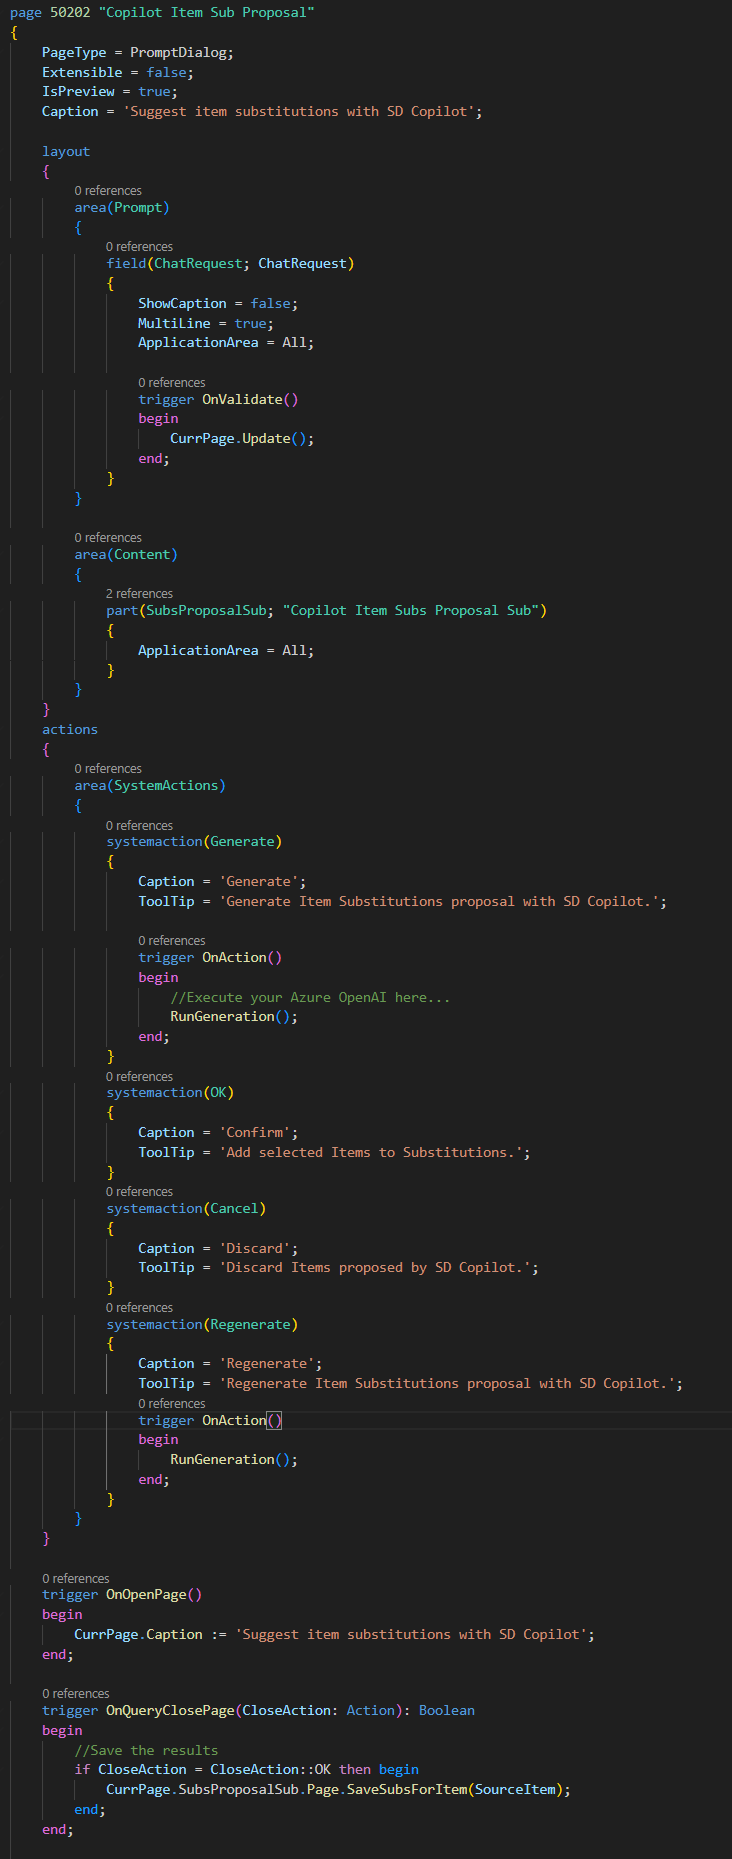
Here is a sample of a Copilot page defined in AL, where you can see all the needed parts and how you need to handle your code:
To execute Copilot from actions in your Dynamics 365 Business Central pages, you need to create an action and you need to assign to that action the new Sparkle icon in order to respect Copilot UI guidelines:

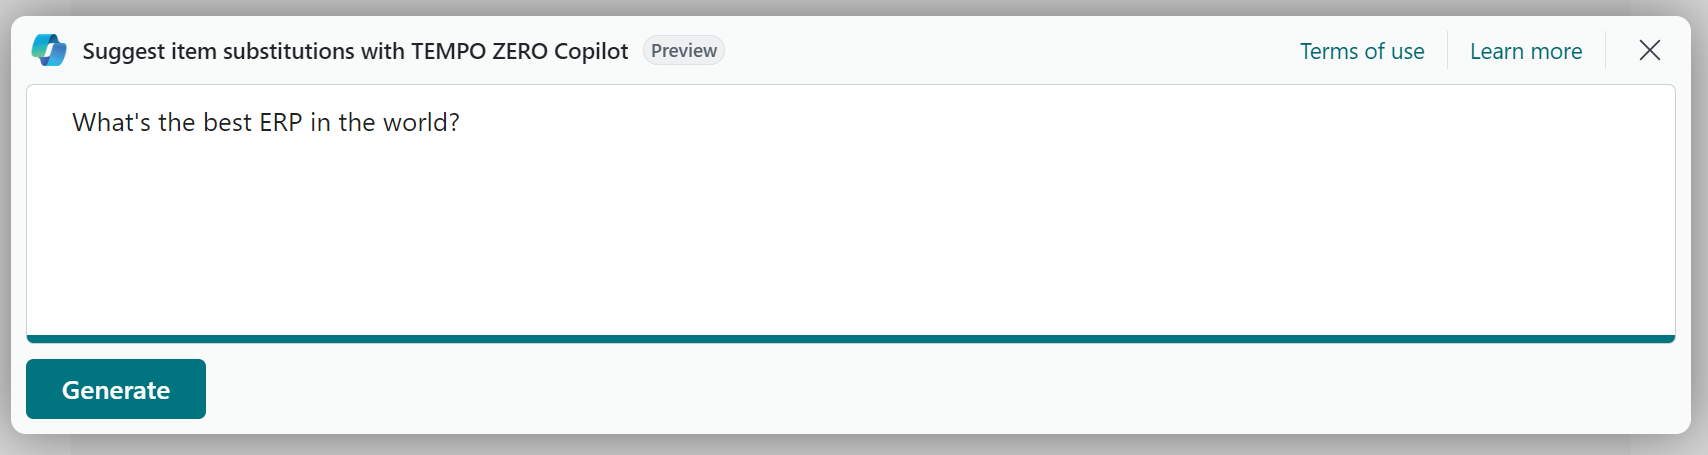
Here is how the action appears to the user:

You have two available images for Copilot actions: Sparkle and SparkeFilled. Using this images is mandatory to respect the UI guidelines for Copilot. Regarding the usage of these icons, official recommendations are the following:
- By default, use the Sparkle image for all Copilot actions.
- If there are multiple Copilot actions in an area, and one of them is considered more “important” or needs to be emphasized, then use the SparkleFilled icon.
- Typically, there will be zero or one “filled” action, while the rest will use the normal Sparkle icon.
Here is how the Copilot page appears when invoked from an action:
After defining the needed user interface and interactions, to start using Copilot from Dyamics 365 Business Central you also need to:
- Deploy an instance of an Azure OpenAI model in your Azure subscription.
- Retrieve the details of the deployed instance (model name, endpoint and access key).
- Register Copilot capabilites from AL.
- Call the deployed model by using the modules provided by the Copilot SDK.
Please note that you will need to use your own key for Azure OpenAI for all your Copilot features (for both development and production).
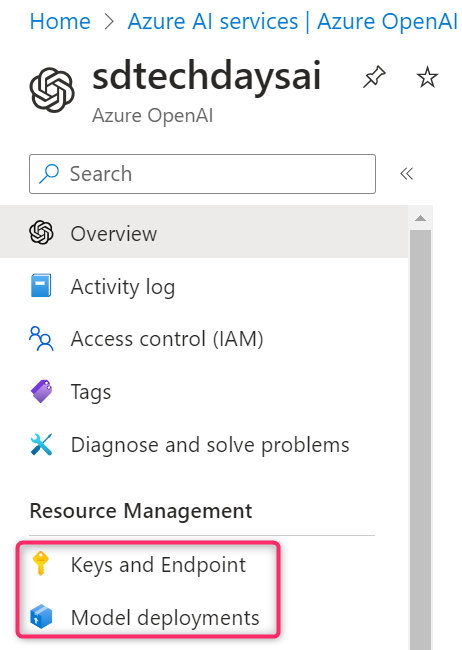
The following image shows a deployed Azure OpenAI endpoint and it indicates where you can find the endpoints, the access keys and where you can deploy AI models:
Before calling the Azure OpenAI model from AL code, you need to register your Copilot capabilities in Business Central and you can do that by using the Copilot Capability codeunit (maybe from an Install codeunit in your extension):

Then, to execute a completion with your AI model, you need to use the Azure OpenAI codeunit like in the following sample (here I’m calling a model with a prompt and I’m retrieving a response):
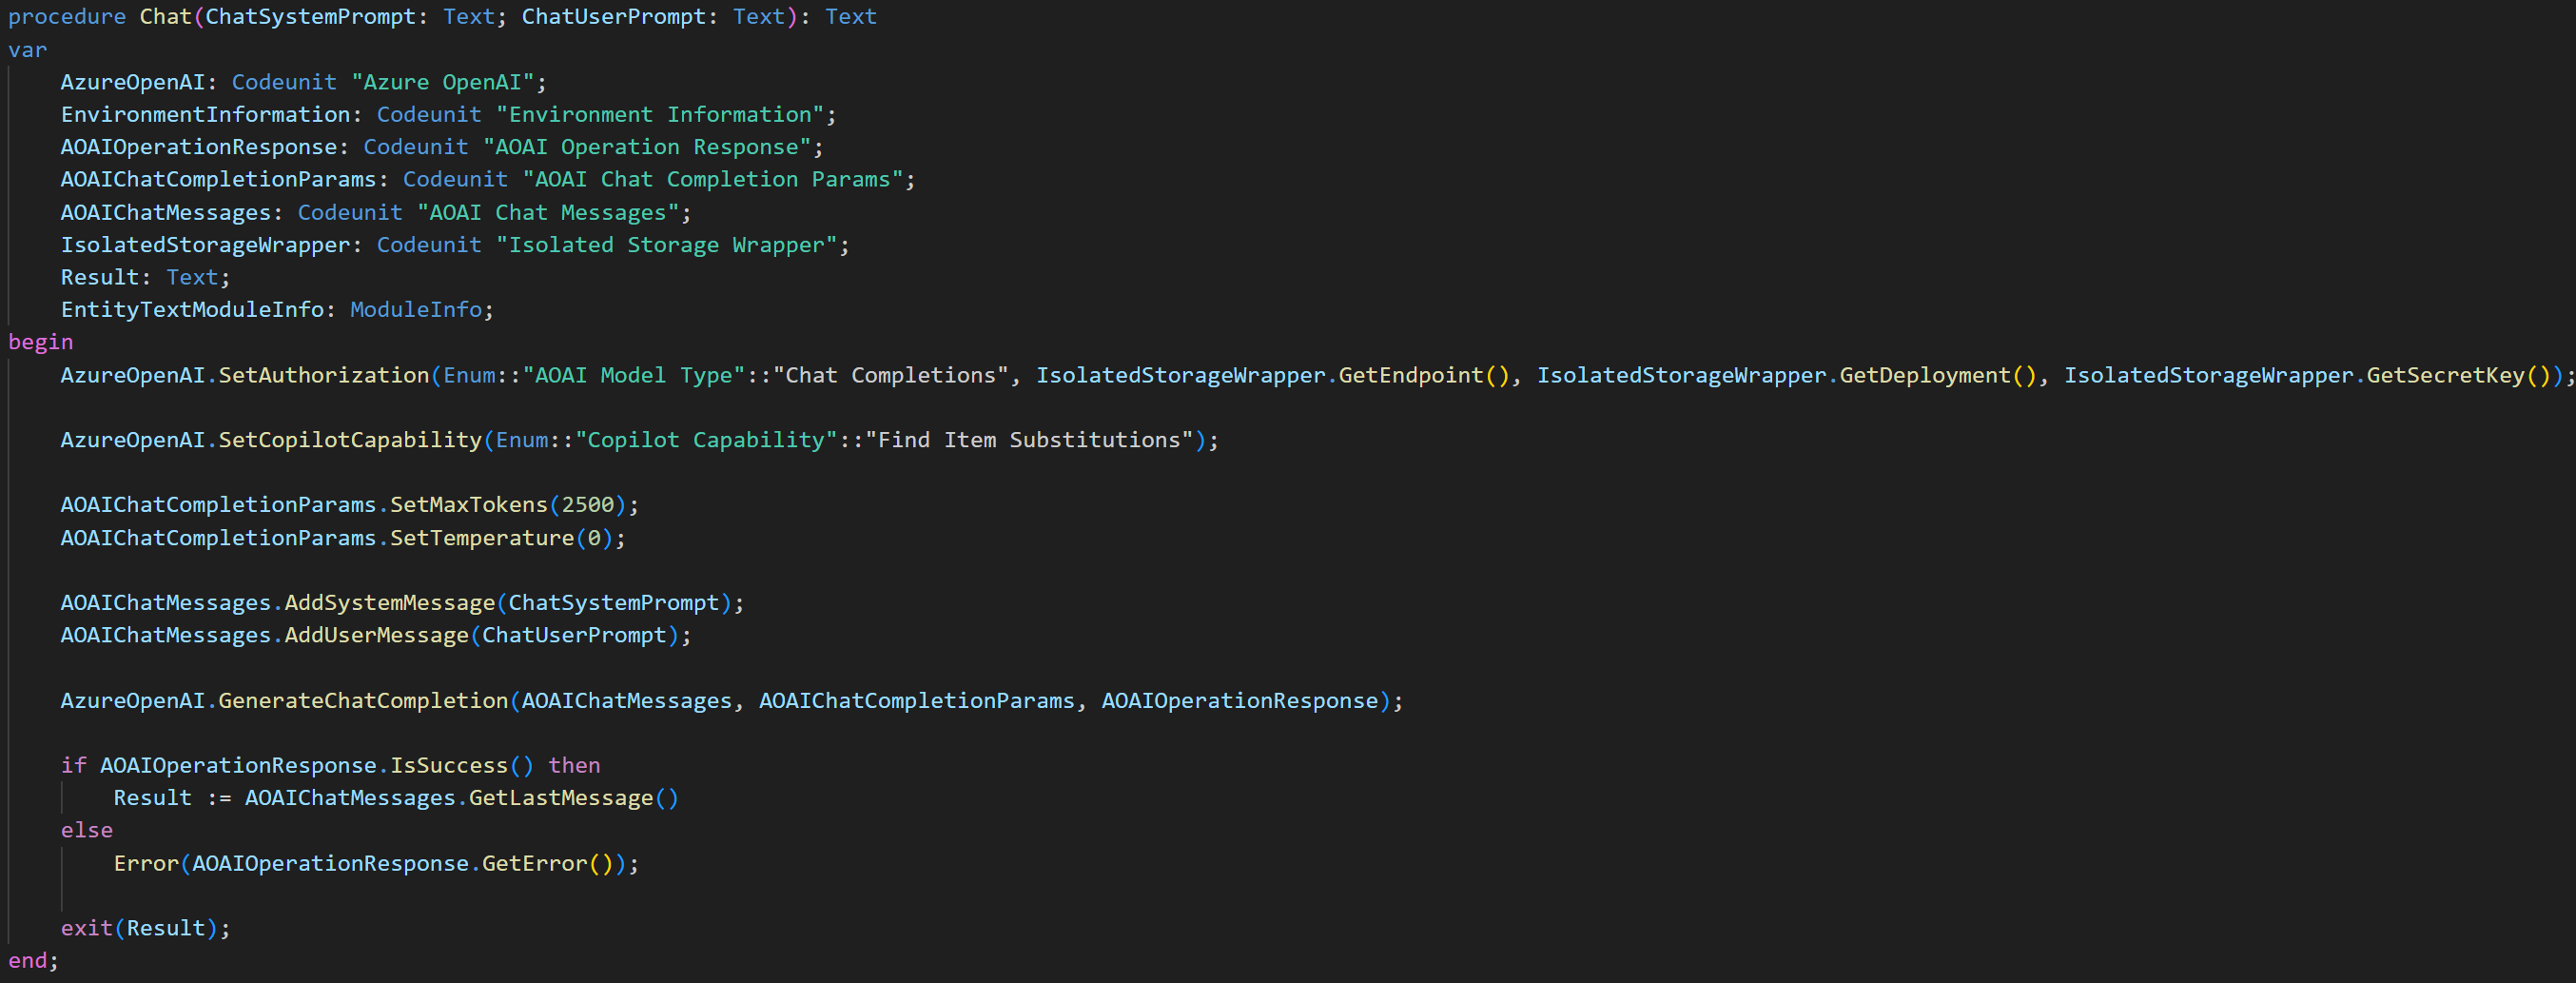
I don’t want to go in full details here on how to use Copilot objects in AL code because the goal of this post is another.
Introducing Copilot in your apps is absolutely something very cool and something that your users will appreciate. If someone of you was in the event we’ve done some weeks ago in Microsoft Italy about Generative AI features in Business Central I think he can agree with me on that because I demoed a lot of real-world scenarios and possibilities, so start preparing your apps for Dynamics 365 Business Central 2024 Wave 1 release when all these features will be generally available.
But on that event I promised also a thing: I will soon talk about problems on using AI and Copilot features in a real-enterprise world. And here it is…
Moving Copilot in Business Central to the real-world…
Now imagine that you’ve created your great Business Central Copilot app with lots of exciting AI features added to your AL solution. The demo for your customers was a great success, everyone agree to have these AI features published in the Production environment available for all.
And all your users start using Copilot… prompt… prompt.. prompt… completions… completions… completions… and then… CRASH!! 😦
The Azure OpenAI service has quotas and operational limits that must be respected. More in details, you have a maximum prompt tokens per request and maximum number of token per minutes that can be sent to the model.
When you have a lot of users using your Copilot features from Business Central continuously and so sending a lot of requests to your Azure OpenAI instance, the service request could fail because the provisioned service could be unavailable due to rate limit. Another possible problem could be that your Azure OpenAI instance could be down for some reasons and this can affect the availability of your Copilot functionalities.
In simple words: using a single Azure OpenAI instance could not be the best choice in a real-world scenario.
Azure OpenAI permits you to deploy multiple service instances in multiple regions and having a load-balancing system in-place able to forward the requests coming from the Business Central Copilot features to the various instances could be a great choice in order to provide redundancy and guarantee service availability.
How to load-balance Azure OpenAI service requests?
There are different ways to load-balance service requests between different Azure OpenAI instances (using Front Door, using Application Gateway etc) but an easy and cost-effective way to do that can be done by using Azure API Management, an Azure service that offers a scalable, multi-cloud API management platform for securing, publishing, and monitoring your APIs (I’ve talked about this service in the past for various scenarios in my blog).
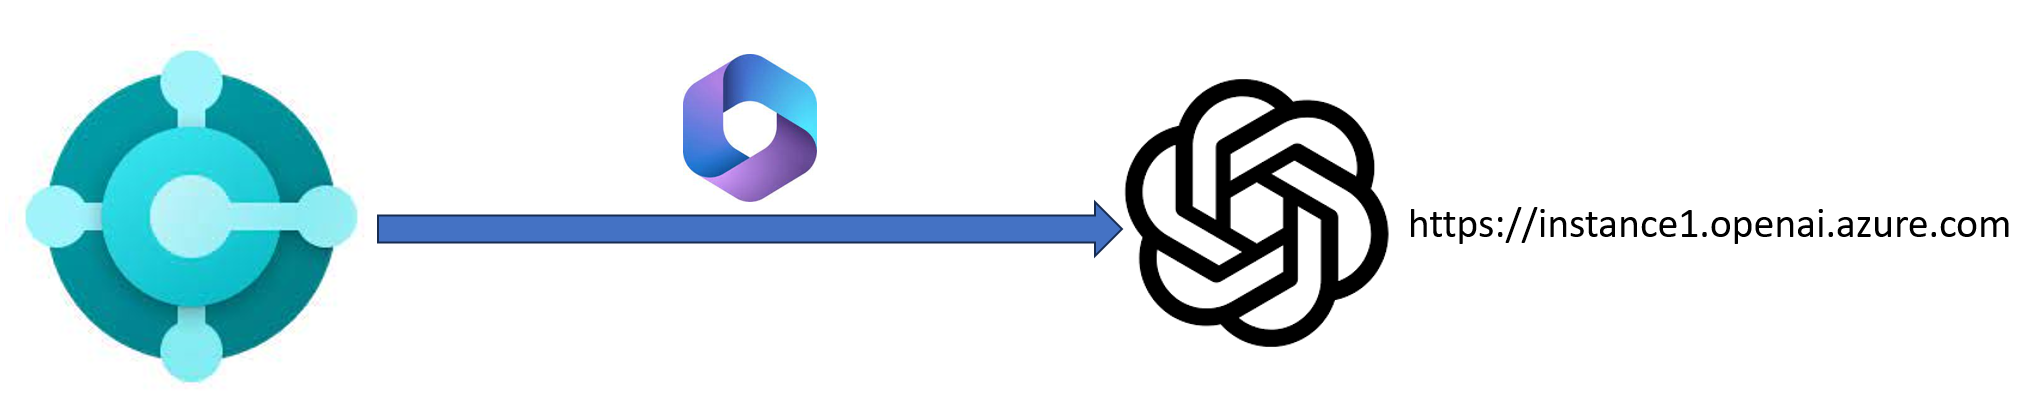
The scenario to be enterprise-ready with Azure OpenAI is to move from the following solution (standard way of using Copilot features in Dynamics 365 Business Central):
to the following solution:
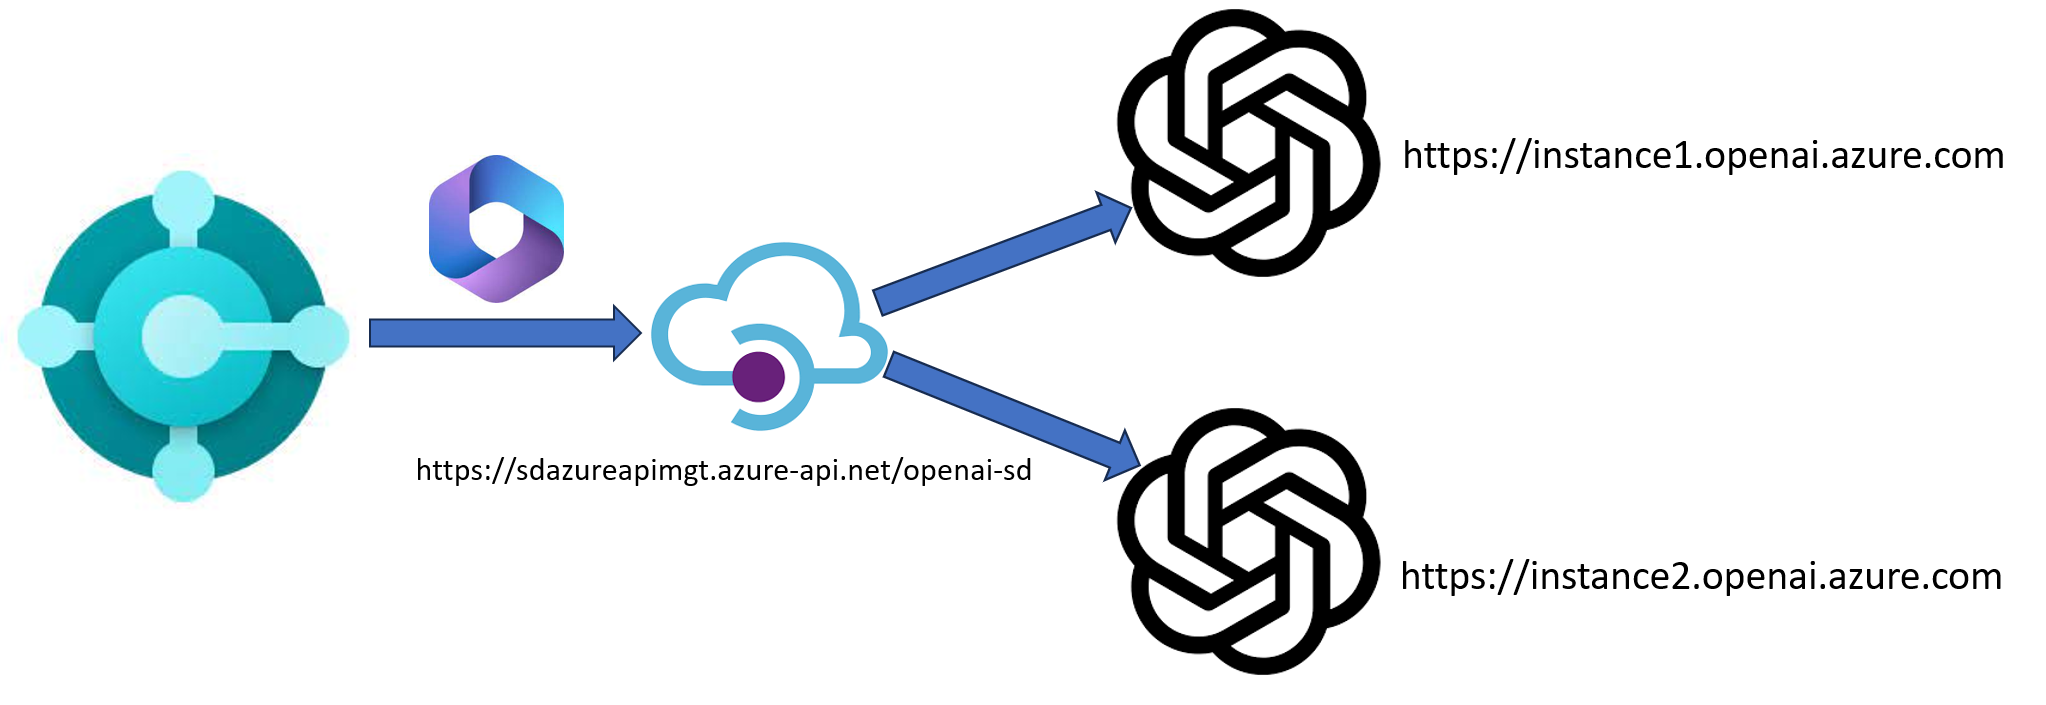
As you can see, here we have deployed different Azure OpenAI instances. Instead of direct calling a single Azure OpenAI instance, to avoid scalability problems and to have redundancy of the service, in this scenario all Copilot requests coming from Business Central are sent to an Azure API Management unique endpoint. Then Azure API Management redirects the requests to the various Azure OpenAI instances accordingly to a routing criteria (and handling the needed authentication securely).
Let’s see how we can create an architecture like in the above diagram.
At first, you need to have an instance of the Azure API Management service deployed in your Azure subscription (informations on how to do that can be found here).
When the Azure API Management service is provisioned, select APIs and then add a new API by selecting the manual definition (HTTP):

Then create a new HTTP API by filling the Display name and Name fields:
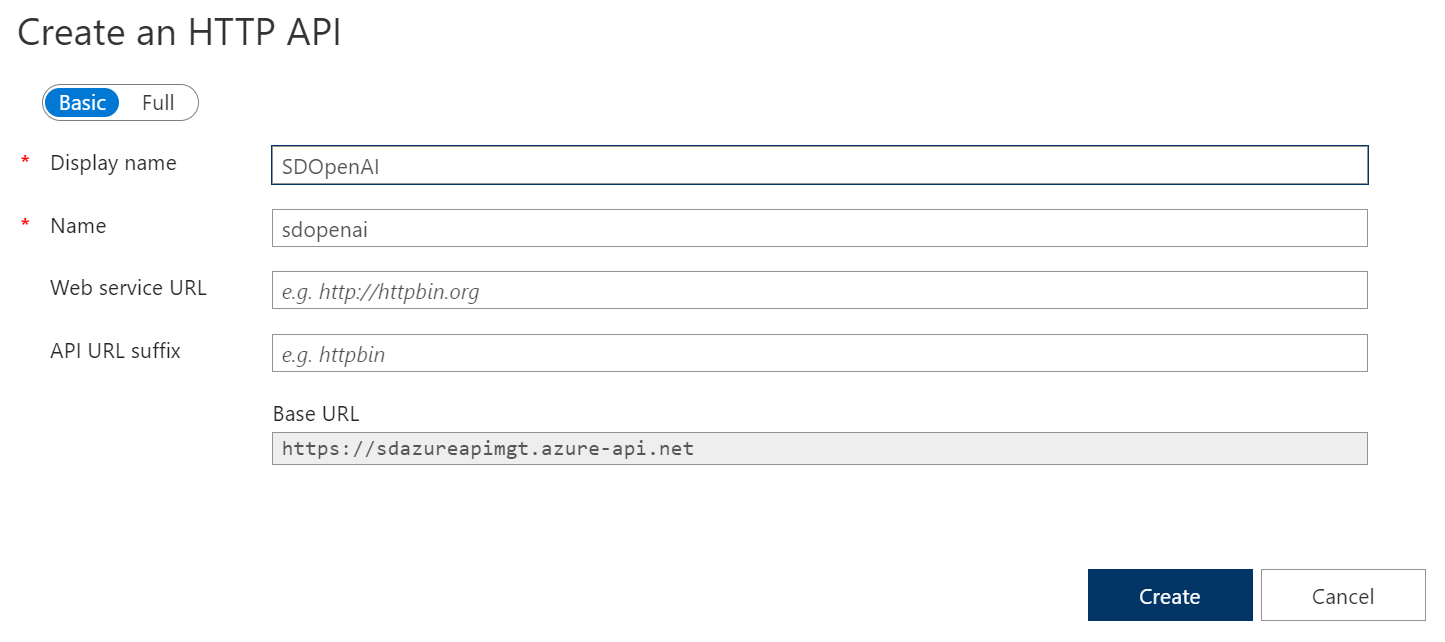
Here you can see the Base URL of your APIs (the API Management url shared with all your APIs defined inside the Azure API Management instance).
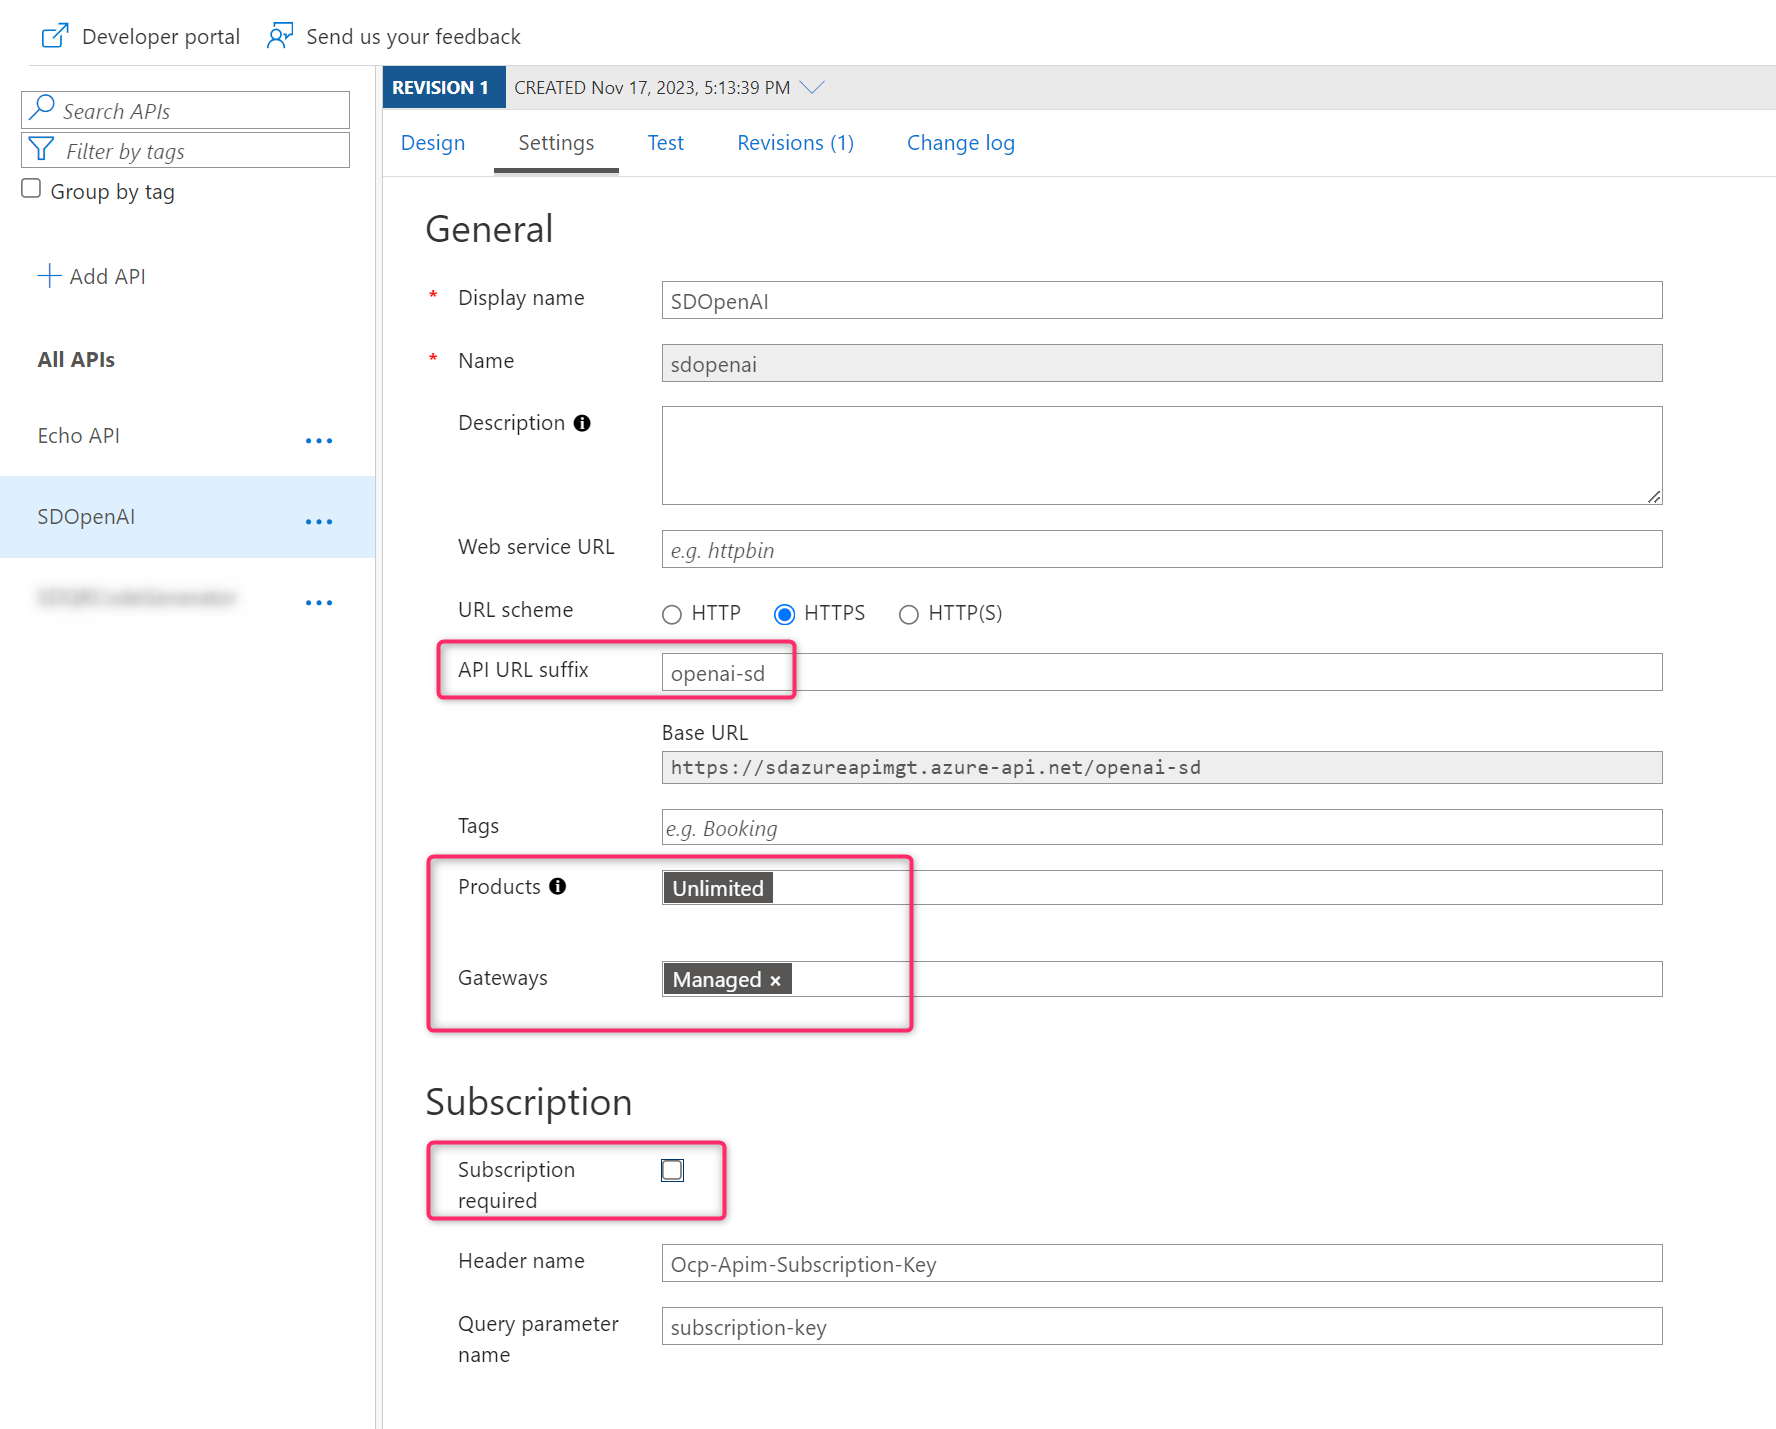
Then select the Settings tab and here:
- Set URL scheme to HTTPS.
- Specify an API URL suffix (it will make your endpoint unique for Azure OpenAI).
- Set Products to Unlimited.
- Set Gateways to Managed.
- Uncheck the Subscription required flag (API keys will be handled in a different way later).
In order to define APIs in Azure API Management, we need to define the frontend (API methods and URLs), the inbound processing (how the request is handled before it’s sent to the backend), the backend (the endpoint to call) and the outbound processing (how the response must be handled before it’s sent to the caller). These are the components of an API definition.
Let’s start with the frontend.
From your API definition, under the Design tab select Add operation. Here we need to define the methods of our APIs. Here I want to insert into Azure API Management a “wrapper” for calling the Azure OpenAI Chat completions API (API that creates chat competions for prompts with the GPT-35-Turbo and GPT-4 models). This API can be invoked by sending a POST request to the following Azure OpenAI endpoint:
POST https://{your-resource-name}.openai.azure.com/openai/deployments/{deployment-id}/chat/completions?api-version={api-version}
To do that, add a POST method with the following url (see image below):
/openai/deployments/{deployment}/chat/completions
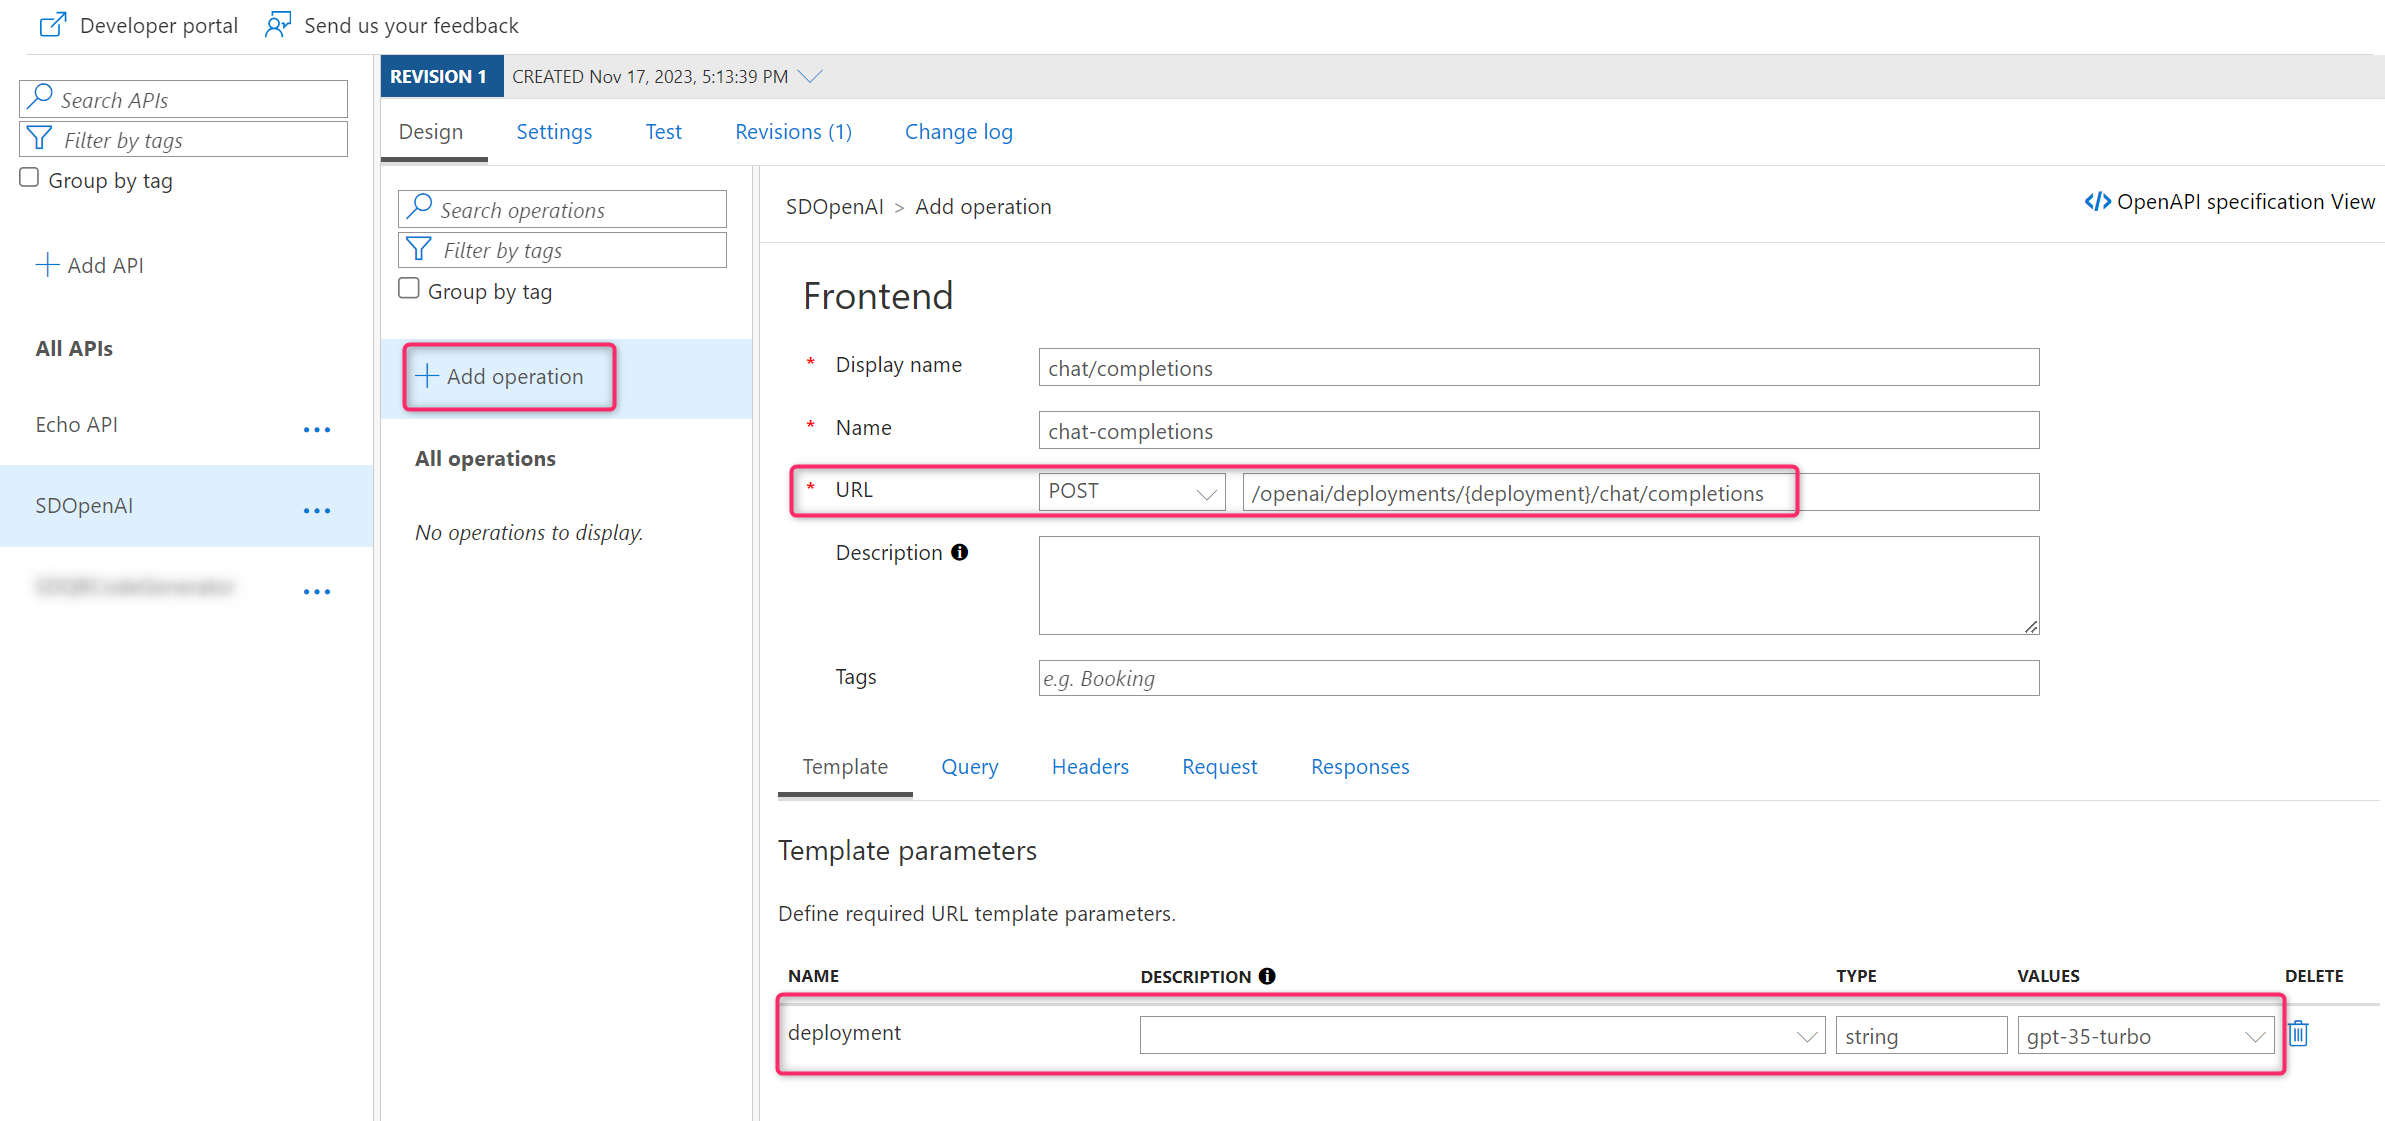
{deployment} is a string variable that will contain the deployed AI model name (in my case it’s gpt-35-turbo).
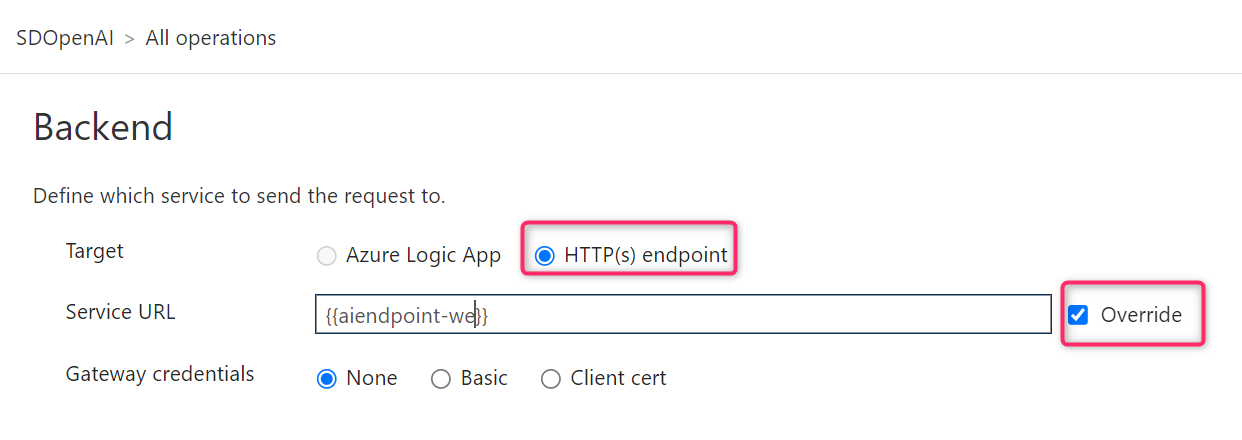
When the endpoint is created, from the Design tab of our API definition now select Backend and click on HTTP(s) endpoint:

Here is where we define the Azure OpenAI API endpoints to call. Set Target = HTTPS and Service URL = url your Azure OpenAI endpoint. Check also the Override flag (see image below):

When the backend is created, we have defined a “bridge” between our Azure API Management instance and the real Azure OpenAI endpoint. In my scenario here, this means that to call the Azure OpenAI Chat Completions API, instead of sending a POST request to the following direct URL:
https://sdtechdaysai.openai.azure.com/openai/deployments/gpt-35-turbo/chat/completions?api-version=2023-07-01-preview
I can now send a POST request to the Azure API Management endpoint:
https://sdazureapimgt.azure-api.net/openai-sd/openai/deployments/gpt-35-turbo/chat/completions?api-version=2023-07-01-preview
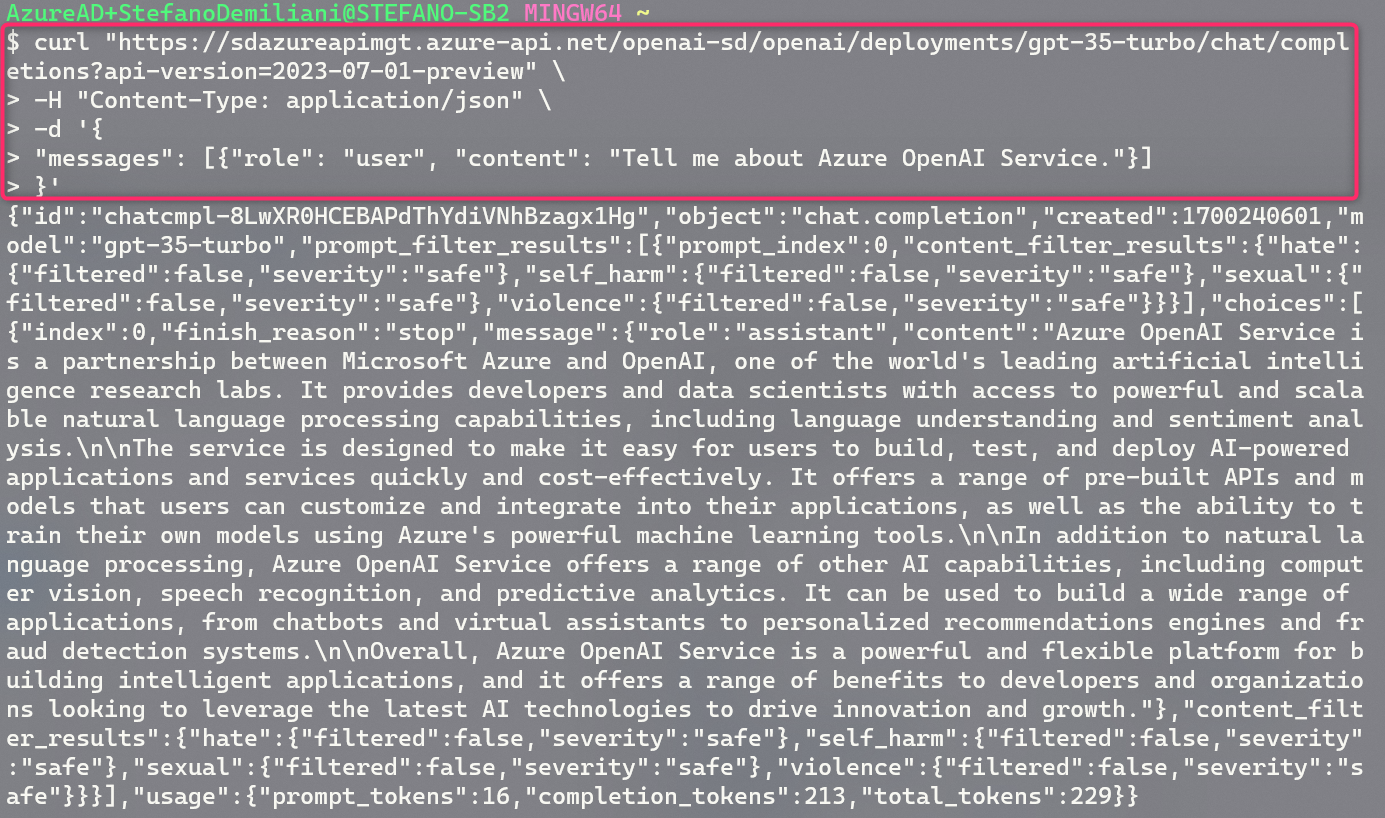
To test if it works, I’m sending the POST request to the above endpoint by using CURL:
curl "https://sdazureapimgt.azure-api.net/openai-sd/openai/deployments/gpt-35-turbo/chat/completions?api-version=2023-07-01-preview" \
-H "Content-Type: application/json" \
-H "api-key: MYAPIKEY" \
-d '{
"messages": [{"role": "user", "content": "Tell me something about Azure OpenAI Service."}]
}'
and here is the answer:

I’m able to call my Azure OpenAI model by passing through the Azure API Management endpoint. Wonderful…
But here there’s a problem… the authentication!
Here I’m passing the api-key parameter required by Azure OpenAI in the HTTP request itself. This is perfect if I’m working with a single Azure OpenAI instance, but the goal of this post is to have N Azure OpenAI instances and then to redirect the HTTP requests to the various instances dinamically, where the api-key parameter is different between instances.
To store the api keys for the various Azure OpenAI instances we can use Azure API Management Named values. Named values are a global collection of name/value pairs in each API Management instance that can be used to manage constant string values and secrets across all API configurations and policies:
To handle our api keys, we need to create a Named value entry for each of the Azure OpenAI instances, like in the following image:
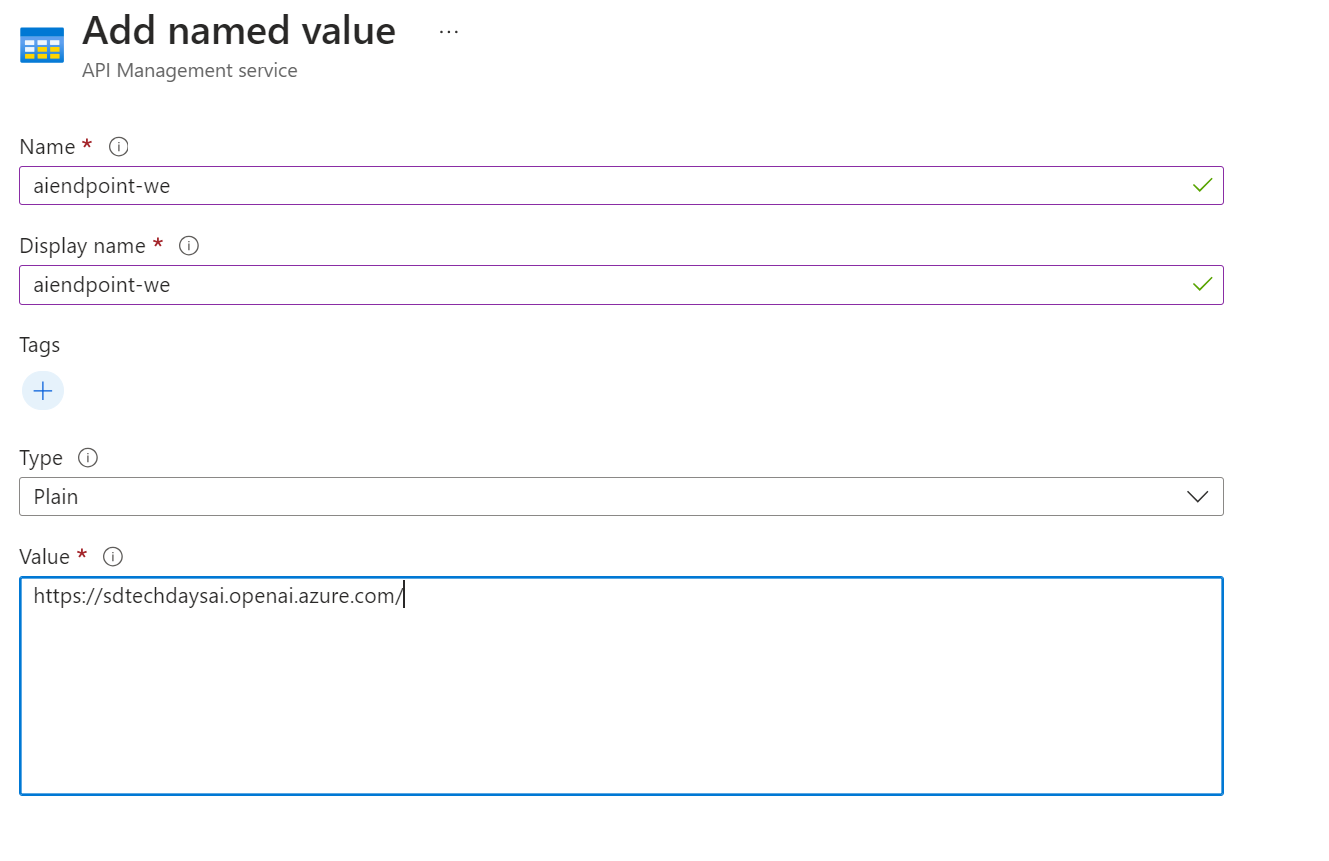
Here I’ve created a named value called aiendpoint-we (Type = Plain text) containing the endpoint of my first Azure OpenAI instance (located in Western Europe). Then I repeat the same for the second Azure OpenAI instance (in my case it’s located in East US):
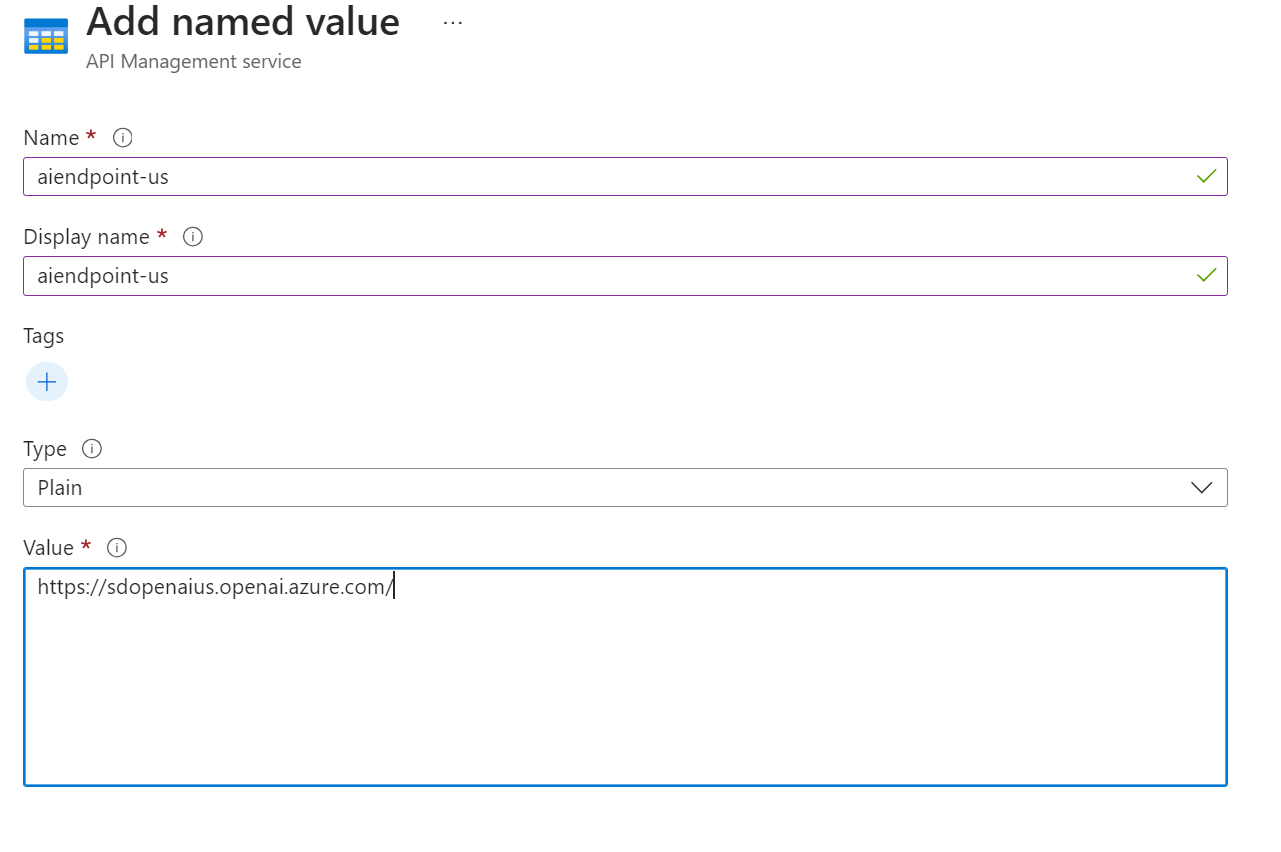
The same can be done for handling the various api keys. For that I create a named value with Type = Secret for each api key, liker in the following image:

Here I’ve defined a secret key called aiendpoint-we-key containing the api key for the first Azure OpenAI endpoint. You need to do that also for the other endpoints you have (in my case I’ve created also a aiendpoint-us-key named value containing the api key of my second Azure OpenAI endpoint).
I can then go to the API backend definition and change the Service URL and pointing it to the previously defined named values by using the following notation: {{Named_Value_Name}}:
Now we need to pass the previously defined api keys variables in the header of the HTTP request in order to be able to call Azure OpenAI correctly. To do that, we need to go into the Inbound processing section and then click on Policies:

In Azure API Management, API publishers can change API behavior through configuration using policies. Policies are a collection of statements that are run sequentially on the request or response of an API. Policies are applied inside the gateway between the API consumer and the managed API. While the gateway receives requests and forwards them, unaltered, to the underlying API, a policy can apply changes to both the inbound request and outbound response.
The inbound processing policy is used to modify the request before it is sent to the backend service. We can inject the api key by using the following inbound policy definition:
<policies>
    <inbound>
        <base />
        <set-backend-service base-url="{{aiendpoint-we}}" />
        <set-header name="api-key" exists-action="override">
            <value>{{aiendpoint-we-key}}</value>
        </set-header>
    </inbound>
    <backend>
        <base />
    </backend>
    <outbound>
        <base />
    </outbound>
    <on-error>
        <base />
    </on-error>
</policies>
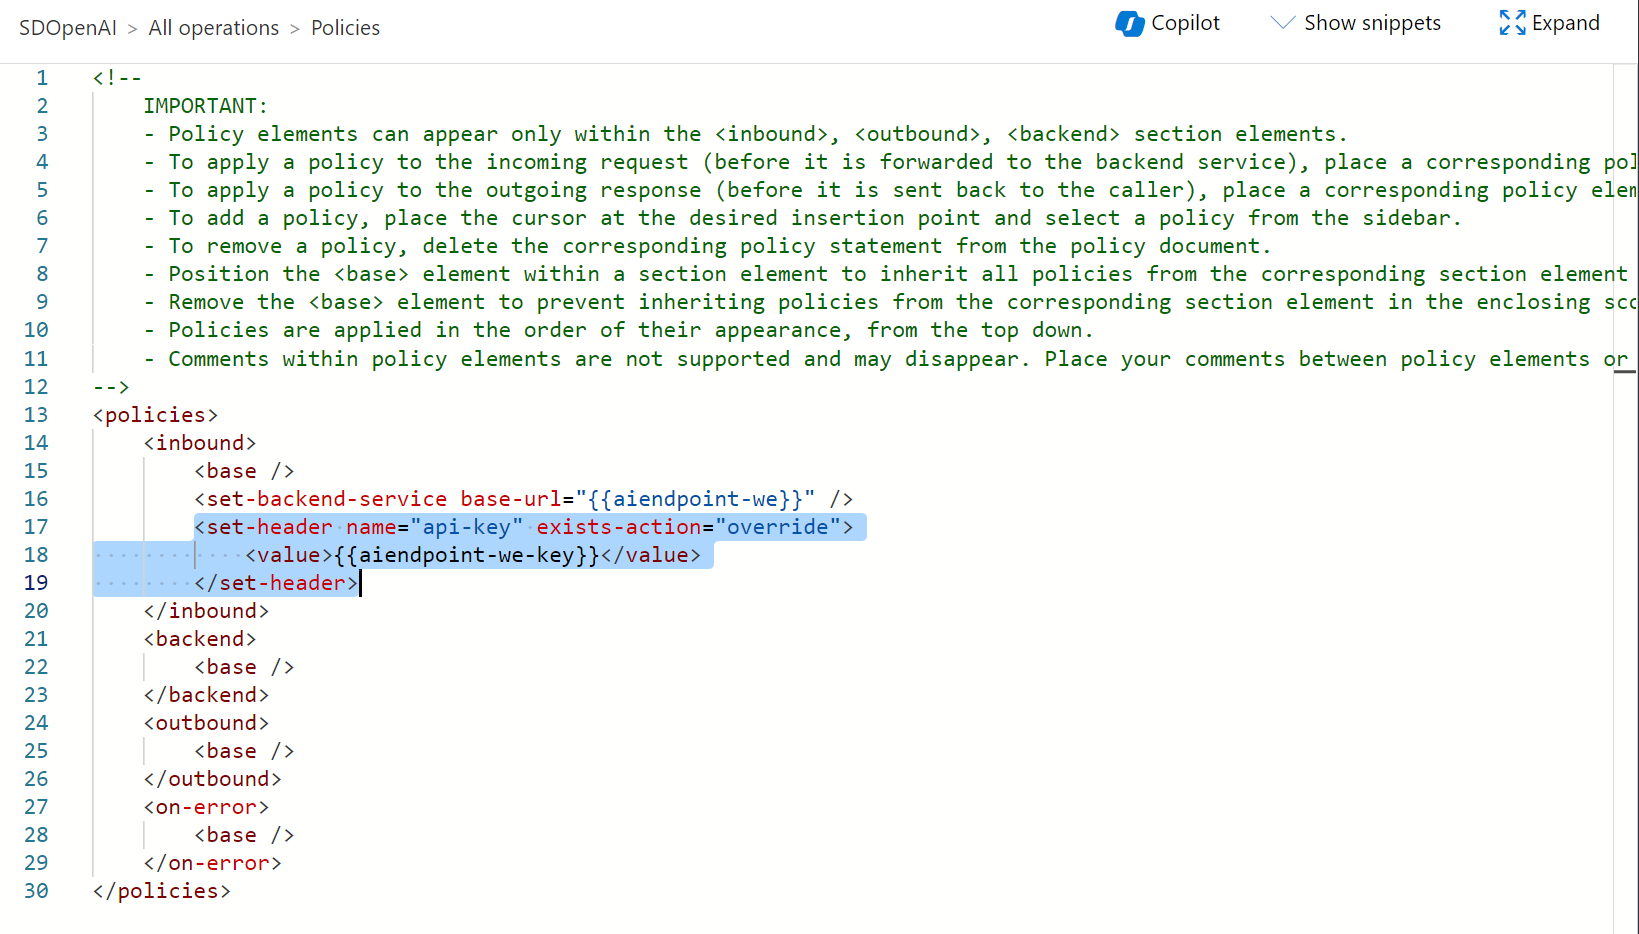
With the above policy, when a request is sent to the Azure API Management endpoint (our unique endpoint for accessin Azure OpenAI) the policy sets the backed service url and inserts the api-key parameter (with its appropriate value) in the request header. Values are taken from the named values parameters previously created.
What happens now?
I can now send a POST request to the unique Azure API Management endpoint without passing credentials and all will be handled by Azure API Management itself (request is routed to the right Azure OpenAI instance with the right authentication key):
As you can see from the above image, I’m not passing any type of credentials now and my Azure OpenAI model is responding correctly.
Handling load balancing
Now we need to handle the load balancing of HTTP requests between the various Azure OpenAI instances. We can do that again by using the Inbound processing policy. Here we can have differen type of logic to route requests between endpoint.
Here I’ve used the following policy:
<policies>
    <inbound>
        <base />
        <set-variable name="rand" value="@(new Random().Next(0, 2))" />
        <choose>
            <when condition="@(context.Variables.GetValueOrDefault<int>("rand") <= 1)">
                <set-backend-service base-url="{{aiendpoint-we}}" />
                <set-header name="api-key" exists-action="override">
                    <value>{{aiendpoint-we-key}}</value>
                </set-header>
            </when>
            <when condition="@(context.Variables.GetValueOrDefault<int>("rand") > 1)">
                <set-backend-service base-url="{{aiendpoint-us}}" />
                <set-header name="api-key" exists-action="override">
                    <value>{{aiendpoint-us-key}}</value>
                </set-header>
            </when>
            <otherwise />
        </choose>
    </inbound>
    <backend>
        <base />
    </backend>
    <outbound>
        <base />
    </outbound>
    <on-error>
        <base />
    </on-error>
</policies>
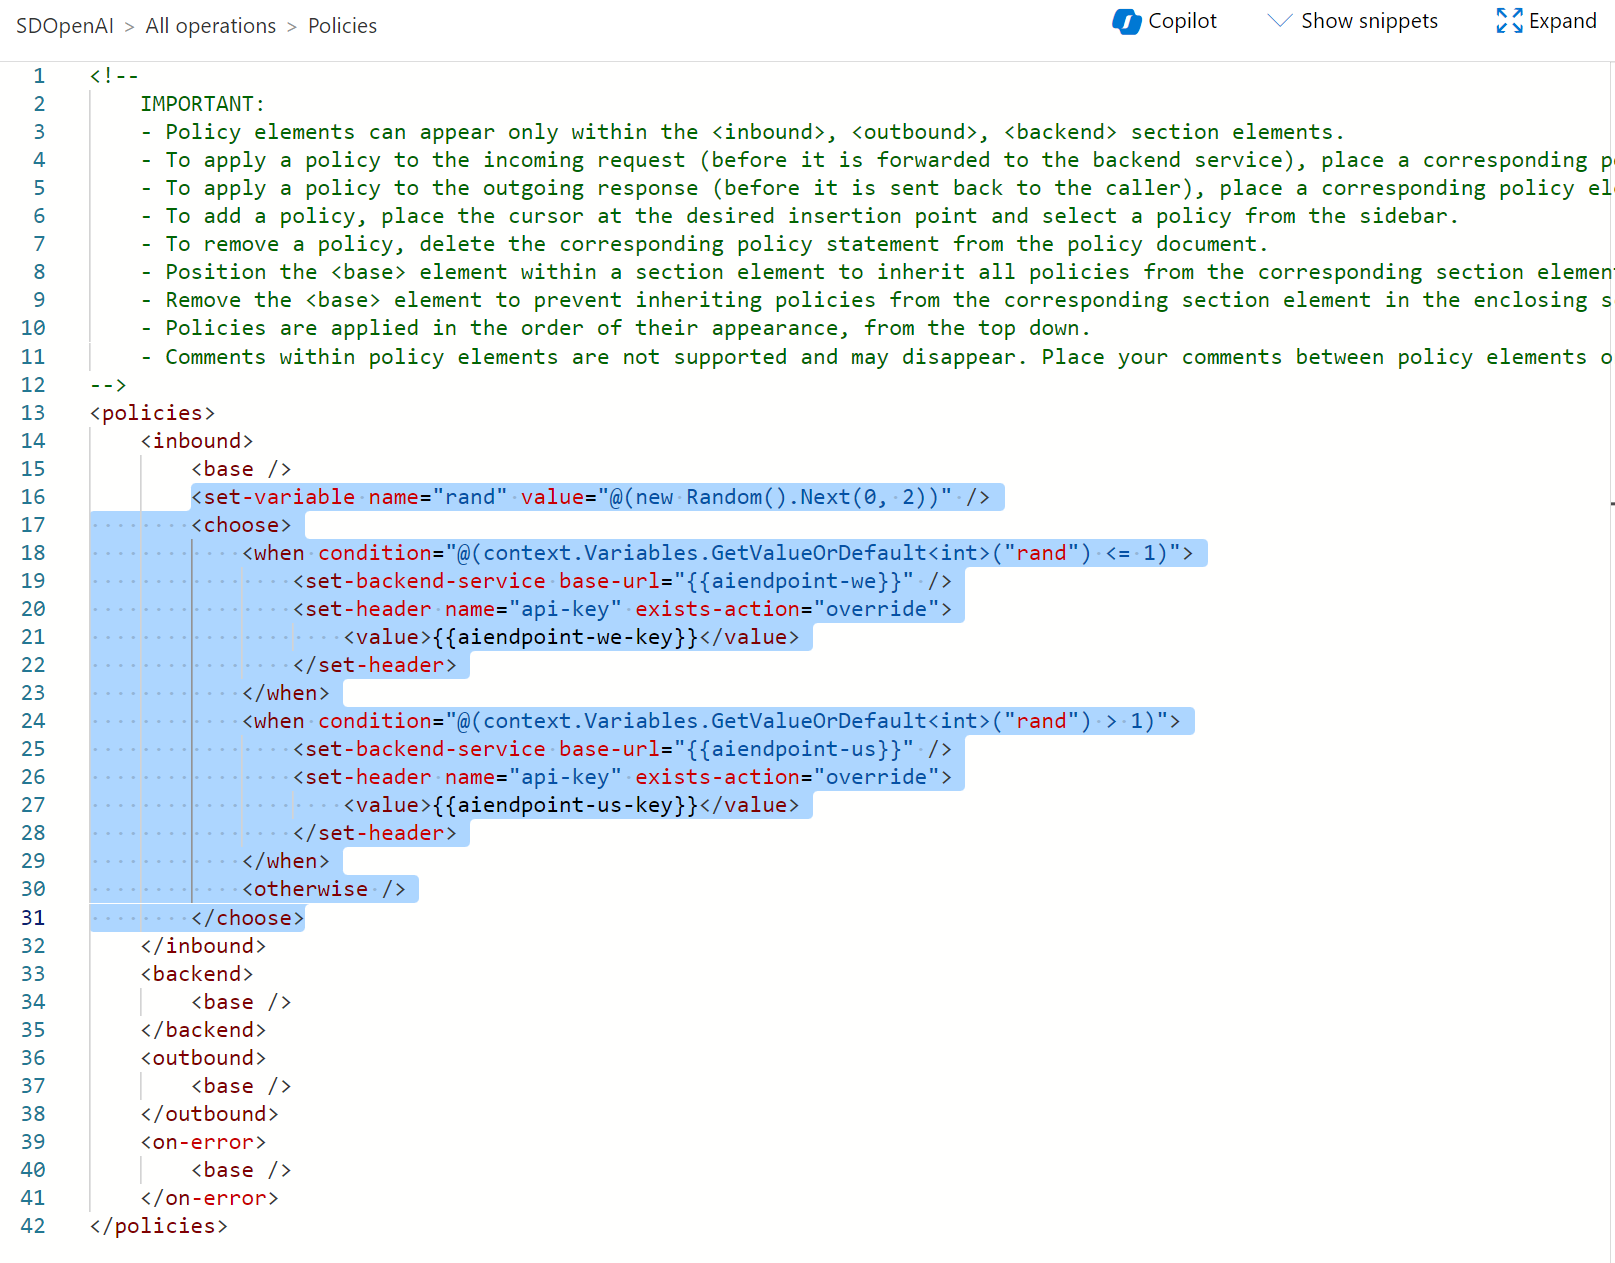
What does this policy do?
It simply generates a random number between 0 and 2. If the generated number is <=1 then the request is sent to the first Azure OpenAI endpoint (ai-endpoint-we), otherwise the request is sent to the second Azure OpenAI endpoint (ai-endpoint-us).
In this way we’re transparently load balancing requests coming from Copilot between N different Azure OpenAI endpoints (2 in my case) and this assures more reliability.
From AL code, you can call the global endpoint without passing any authentication key and all will be managed for you.
Conclusion
Copilot in Dynamics 365 Business Central is cool, but you need to remember that if you want to introduce your own Copilot features into your solutions you need to check for the operational limits of the Azure OpenAI service and act accordingly. A solution that works with 10 users using Copilot from Business Central could not work if users using Copilot are 100…
You can also do more advanced features like handling automatic retries of failed Azure OpenAI requests or handling a more complex authentication with Microsoft Entra ID, but these could be topics for another post (I think that this is enough at the moment).
Load balancing can also be handled in more complex ways and maybe I’ll write a second post about that soon.
Have fun with AI in Dynamics 365 Business Central then… and don’t forgot what I always emphasize when I talk about this topic (my most famous slide revisited):

Prompt is key: if you have good data input and good prompt, you have good results. Otherwise… 😉
