

If someone of you remember, in the past I wrote about doing performance testing of Azure Functions using tools like Apache JMeter. Now, the Azure platform has a nice new tool (currently listed as in preview) called Azure Load Testing.
Azure Load Testing is a fully managed load-testing service that enables you to generate high-scale load. The service simulates traffic for your applications regardless of where they’re hosted, it abstracts the complexity and infrastructure to run your load test at scale and collects detailed resource metrics to help you identify performance bottlenecks across your Azure application components.
It’s important to say that the application that must be tested can be hosted anywhere: in Azure, on-premises, or in other clouds. During the load test, the service collects the following sets of resource metrics and displays them in a dashboard:
- Client-side metrics give you details reported by the test engine, like the number of virtual users, the request response time, or the number of requests per second.
- Server-side metrics provide information about your Azure application components in use (like number of database reads, the type of HTTP responses, container resource consumption etc.).
The following Microsoft’s diagram shows how Azure Load Testing works:

If we have the possibility to have a full cloud load testing service, why don’t use it to test the performances of our Azure Functions apps? This could be useful in order to test if a function app performs well under heavy loads or if the scalability of the function app is well setted or not.
To start using Azure Load Testing, we need to create an Azure Load Testing instance from the Azure Portal:

Please not that at the time of writing this post, not all Azure Regions can be selected (so select the region nearest to your application to test).
When the Azure Load Testing instance is provisioned, you need to grant the appropriate Load Test role to your user (or the users that need to run tests). To do that, select your Azure Load Test instance, then select Access Control (IAM) and here Add role assignment:

Here you need to create your role assignments. Currently you can assign the following three roles:
- Load Test Reader: Read-only actions in the Load Testing resource. Readers can list and view tests and test runs in the resource. Readers can’t create, update, or run tests.
- Load Test Contributor: View, create, edit, or delete (where applicable) tests and test runs in a Load Testing resource.
- Load Test Owner: Full access to the Load Testing resource, including the ability to view, create, edit, or delete (where applicable) assets in a resource. For example, you can modify or delete the Load Testing resource.
Please note that if you have the Owner, Contributor, or Load Test Owner role at the subscription level, you automatically have the same permissions as the Load Test Owner at the resource level.

When all is correctly set up, you can start creating your load tests. At the time of writing this post, you can create a load test in two ways:
- Create a quick test by using a web application URL: useful to quickly load test a single web endpoint.
- Create a test by uploading a JMeter test script (JMX); useful for reusing an existing JMeter test script, or for more advanced test scenarios.
For demonstrating the load testing of an Azure Function app, here I will use the quick test approach.
Select the Tests menu under your Azure Load Testing instance and then click on Create|Create a quick test:

In the Quick test creation page you need to enter the endpoint (url) to test and the load parameters:

In the above sample, I’ve tested my Azure Function endpoint with a load test of 10 virtual users, a test duration of 120 second and a ramp-up time of 5 seconds.
When the test is created, you can start it. results are displayed in a dashboard like the following:

Here you can see the number of virtual users, the endpoint respose time under the generated load and the averare requests for seconds distribution. My Azure Function app here has received 45084 requests in 2 minutes with an average response time of 31 ms.
I can also check the Azure Function app metrics to discover the memory usage and data usage:
Now I can repeat the load test with an increased load, like the following:
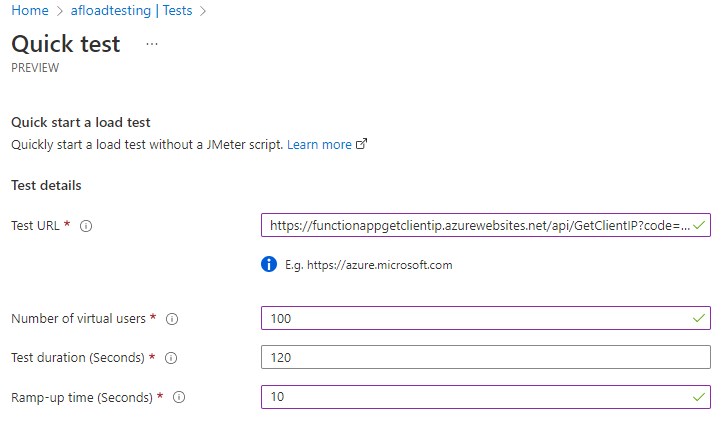
In this case the number of virtual users is increased to 100 in a ramp-up time of 10 seconds. The test duration is always 2 minutes. Results of the load test execution are the following:

The number of incoming requests to my Azure Function app is increased to 349230 with an average response time of 41 ms.
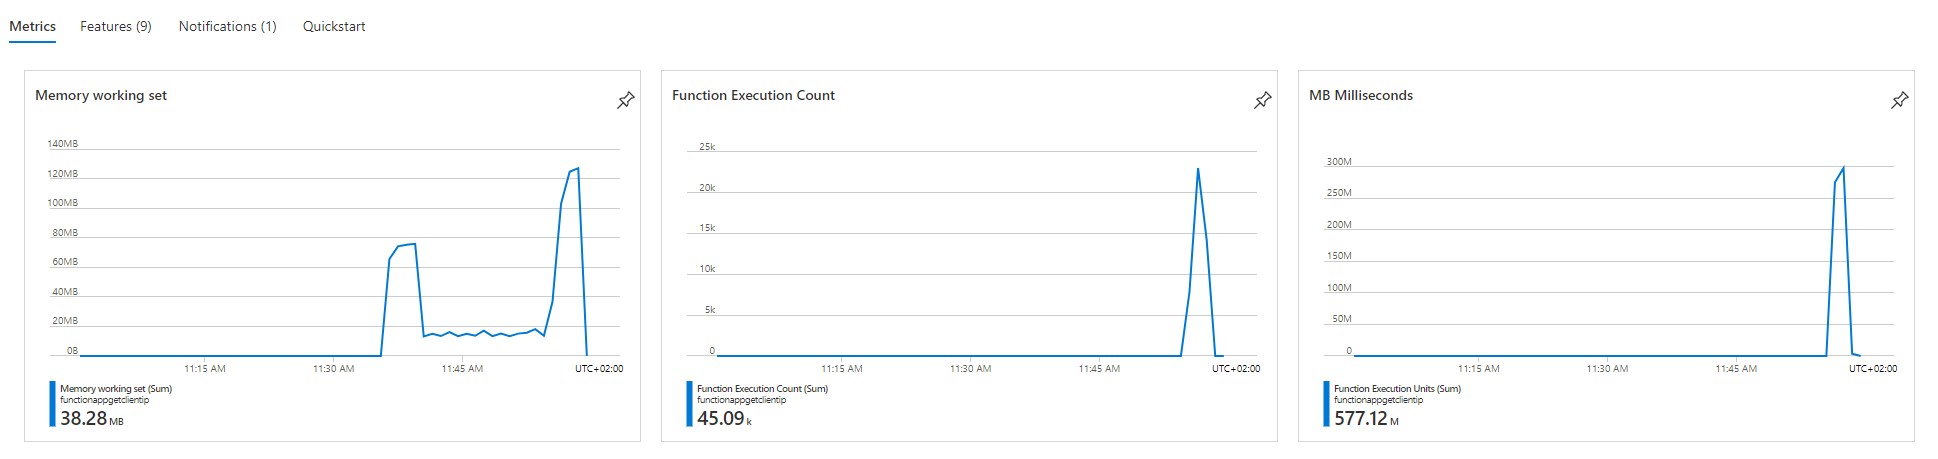
The Azure Functions metrics are the following:

From the above chart you can see that the execution count (number of requests received) is highly increased compared to the previous test, but the memory usage is not increased too much (the function app execution is not consuming too much memory) and the response time is always good. My Function app can support the increased load.
You can execute the load test multiple time and you can also directly compare different execution of the same test. To compare test runs in Azure Load Testing, you’ll first have to select up to five runs within a load test. You can only compare runs that belong to the same load test (a test run needs to be in the Done, Stopped, or Failed state to compare it).
To compare load tests, just select two or more test runs by selecting the corresponding checkboxes in the list of tests and click Compare:

Each test run is now shown as an overlay in the different graphs in a new dashboard:

Why comparing tests is in my opinion important? For a main reason: identify performance regressions.
Imagine for example to have the need to deploy a new version of your Function app, with some code changes. By comparing tests, you can verify that the performance hasn’t degraded with this new version of function app.
Azure Load Testing auto-generates an Apache JMeter script for your load tests. You can download the JMeter script from the test run dashboard by selecting Download and then select Input file:

You can also download the test results file as a zipped folder by selecting Download|Results. The folder contains a separate CSV file for every test engine and contains details of requests that the test engine executed during the load test.
Azure Load Testing can also be integrated into CI/CD pipelines for continuous regression testing with Azure DevOps or Github Actions.
For Azure DevOps pipelines, you need to install the Azure Load Testing task extension from the Azure DevOps Marketplace:

and then you can add a pipeline task like the following:

As you can see, this tool can be extremely useful for testing your cloud applications. My focus here is on Azure Functions apps because I think that they are an important building block of serverless architectures and also an important building block on many Dynamics 365 Business Central SaaS projects. Discovering if your function apps work well under heavy load is often important and if your function apps run under an App Service plan (dedicated plan) discovering if your resources are correctly sized can help you on save money and avoid problems.
Last important note to share is related to pricing. Azure Load Test is not a free service and when you create a load test now the portal gives you an estimate of the usage (directly connected to the price). Details about the pricing can be found here, but essentially you pay a fixed price of about $10 per month that includes 50 Virtual User Hours per month + you can add additiona virtual user hours.
If you don’t plan to use any of the resources that you created for a load test, remember to delete them in order to avoid paying for the allocated resources.
