


All the people that were on my Dynamics 365 Business Central Development courses for Microsoft Italy (and that will be in the next months) already knows that one of the topic that I always I try to emphasize is related to source code management.
Source Code Management (SCM) is a must to have when working with AL (code is now on files and not inside the database as in C/AL) and you absolutely need to have a good SCM system in place inside your organization.
Normally during my courses I provide a practical overview of two systems:
Normally I emphasize the SCM features of these two platforms (GIT support etc) and how you can manage projects and repositories (pull, push, branches etc) directly from Visual Studio Code. Both are great platforms for SCM with GIT. For free, GitHub provides unlimited public repositories but no private repositories, while Azure DevOps gives you unlimited public and private repositories for teams with a maximum of 5 people (over that number you have to pay for users).
When people asks me what I prefer or what I recommend, I’ve no doubts on the answer: Azure DevOps.
I think that for working in teams inside a company (so not only for open source projects), Azure DevOps is much better and it offers many more features that GitHub. The main differences in my opinion is expecially related to project management and testing/pipelines.
I’m not an Azure DevOps guru for sure, but I want to talk here a bit about many interesting Azure DevOps features that you can start using from today for managing your Dynamics 365 Business Central development projects.
To start, first of all you have to open a new project in Azure DevOps, select the project visibility (public or private), the Version Control system (GIT or TFS) and the Work Item Process you want (Agile, Scrum etc):

When the project is created, you can go to the project page and start to invite your team’s members:

When the project is created, a GIT repository is created online for you (and from here you can clone it locally etc., I don’t talk about that now).
As a project manager, the first thing you can do is to click on Backlogs and create a backlog for your project (product backlog corresponds to your project plan, the roadmap for what your team plans to deliver). Here you can create phases and tasks and assign that tasks to users:

On the right side of the Backlog page you have the Sprint panel. With Scrum methodology, teams plan and track work at regular time intervals, referred to as a sprint cadence. You define sprints to correspond to the cadence your team uses. You can select a Sprint, define the starting and ending date and then assign activities from Backlog to a specific Sprint by dragging the activities (here for example I assign the Customer Category Development activity to the Sprint 2):

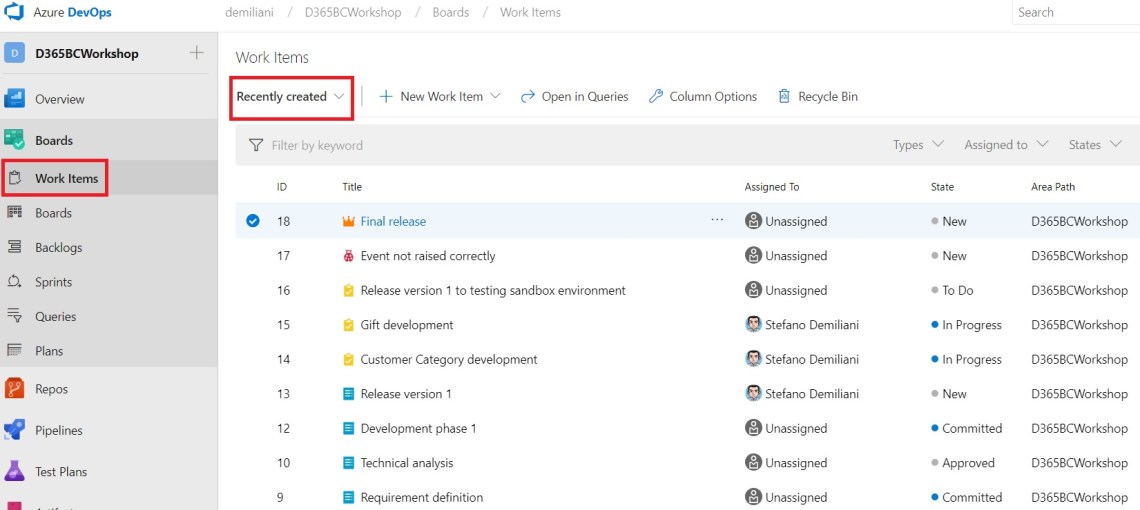
After scheduling activities and sprints, you have also other interesting views. If you click on Work Items, you can see the work items status (only work items assigned to you, all work items etc):
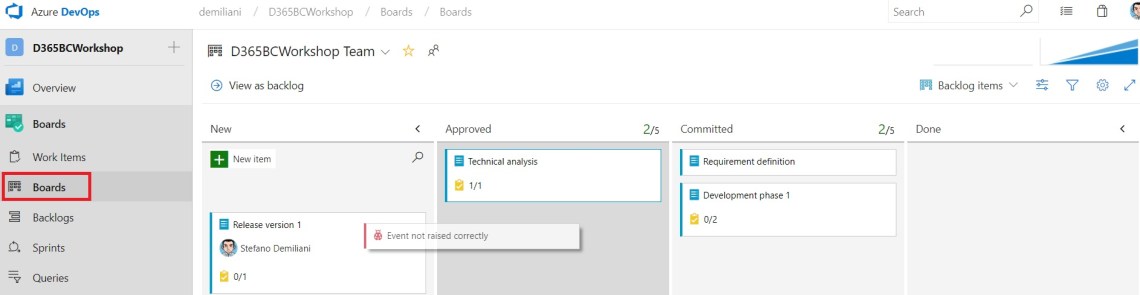
If you click on Boards, you can have a board of your project (view of your project tasks as card ordered by status where you can move tasks by using drag & drop in order to change their status):
If you select Sprints you can see details of every sprint (iteration path) defined in your project. Here you can have a Taskboard view and you can see the sprint backlog and capacity:

From here you can monitor the progress of every sprint.
Another interesting feature that I use quite often is what is called the Delivery Plan. Delivery plans display work items as cards along a timeline or calendar view and this is very useful to see expected release dates or delivery dates for your team activities. Delivery Plans are not a standard feature and to have them you need to download and install a Microsoft’s DevOps extension from the marketplace (click on the bag icon on top right corner of your page). The extension is the following (Microsoft, please add it as default in a project workspace):

When installed, you have a new menu called Plans on the left and by clicking on it you can see your project delivery plan on a timeline:

The coolest part is that all these project management features are available in a single tool and are totally integrated with the development tools you use every day (alias Visual Studio Code).
Just as a quick example, I can click on Repos and clone the GIT repository to a local folder on my machine:
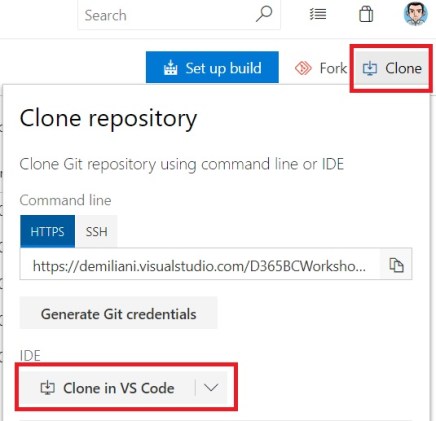
You can choose where to create the repository and in few seconds you have a local GIT repository connected to your Azure DevOps repo:

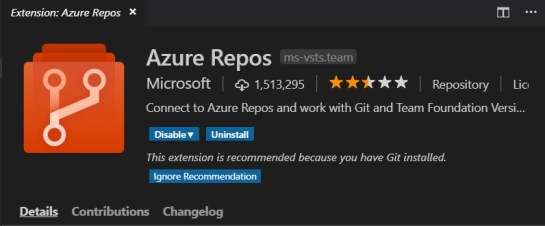
To use Azure DevOps repositories with Visual Studio Code, you need to install the Azure Repos Extension for Visual Studio Code:
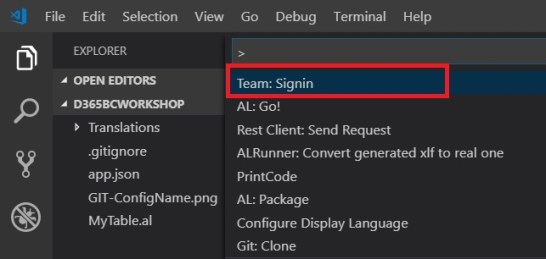
Yu can connect to your Azure DevOps repository by using the Team:Signin command:
For authentication, select the following method:

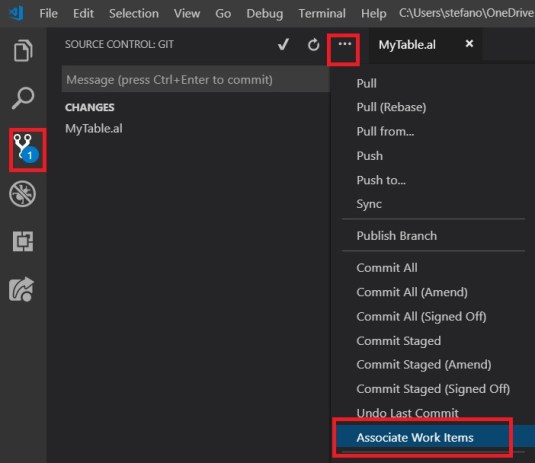
When connected, you can start work with your AL project. You’re working on a GIT repository, so every time you modify a file the GIT icon in Visual Studio code alerts you that you have some pending changes. When you’re ready to go with your work, you can click on the GIT icon in Visual Studio Code, select the 3 dots icon and then click on Associate Work Items:
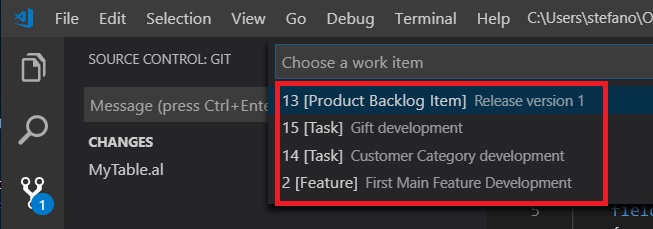
This is not mandatory, but if you work with work items and sprints I recommend to do so because with this feature you can associate your commit to a work item (you can select to the work items assigned to you):
When the work item is selected, you can commit your changes (file by file or entirely for every modified files) by clicking the Commit icon (you can see the branch you’re working on in the bottom left corner):

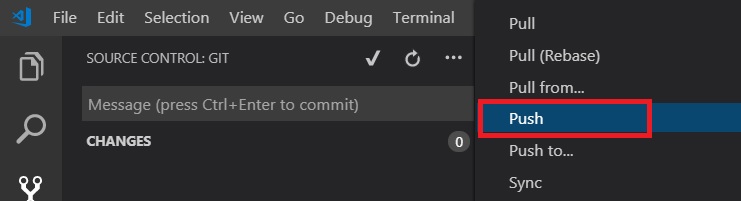
Now you can push the modification to the remote repositoy on Azure DevOps:
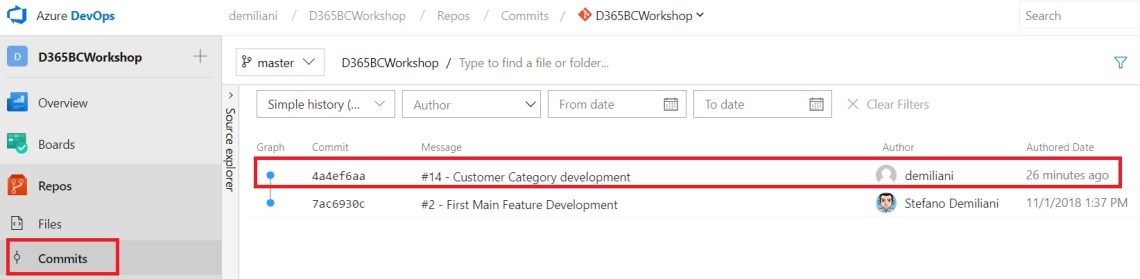
Now, if you go to Azure DevOps and select Repos –> Commits you can see your commit phase:
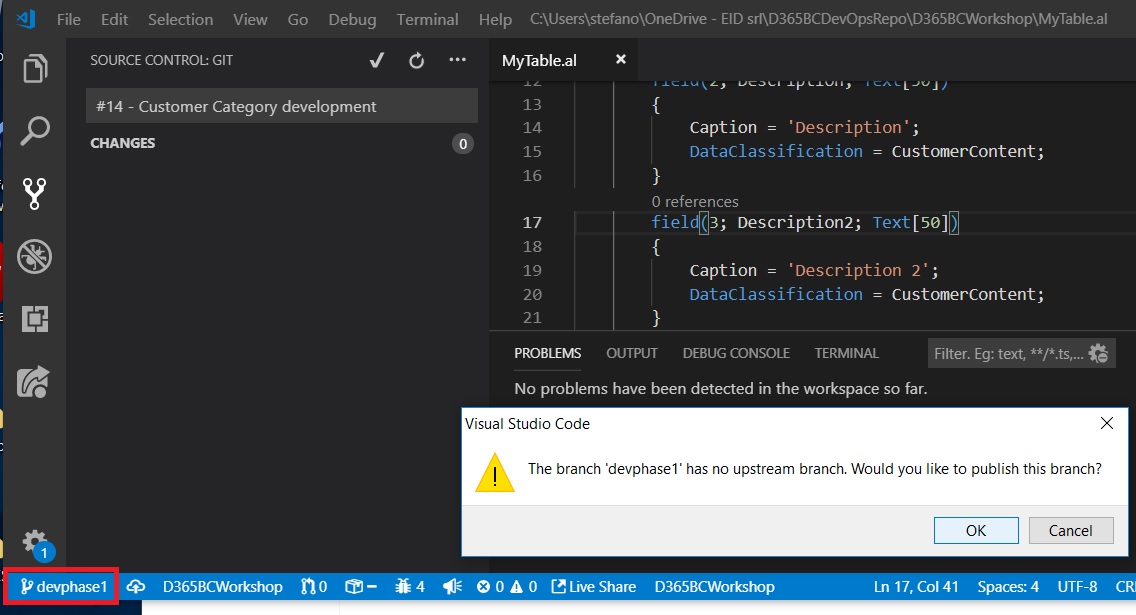
If you have to perform large code modification/implementation, you can work with branches. You can create a new branch directly from Visual Studio Code by clicking on the branch name in top left corner:

When you push your code modification on the new branch remotely, a message appears:
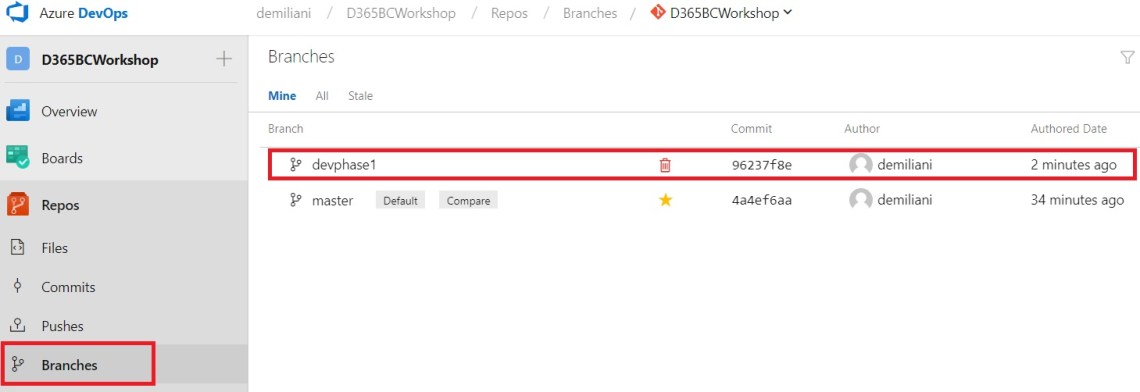
By clicking OK, your newly created branch is published online. You can see it on Azure DevOps on the Branches page (here you can see your branches and also all the other branches published by other team members):
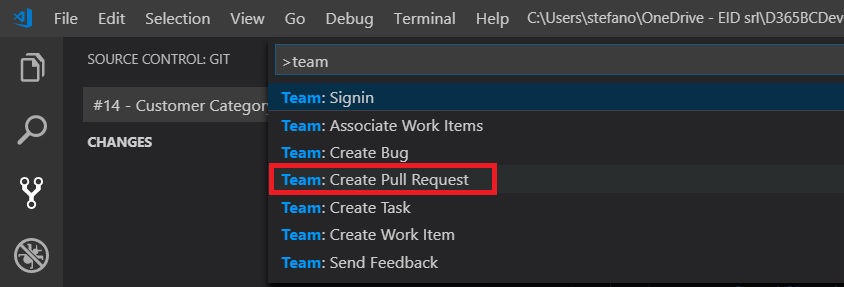
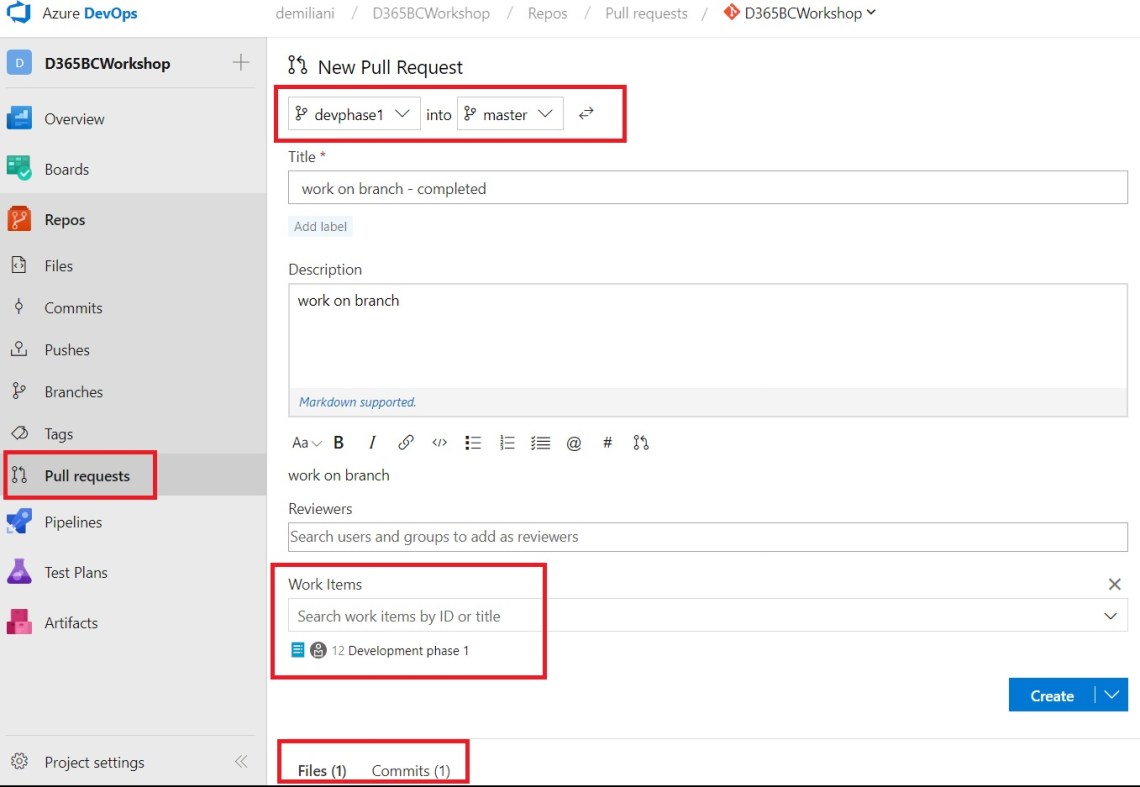
When the work on the branch is finished, you need to merge it to the master branch. To do so, you need to create a pull request and you can do that directly from Visual Studuo Code:
This action will open the New Pull Request page in Azure DevOps. Here you can create your pull request:
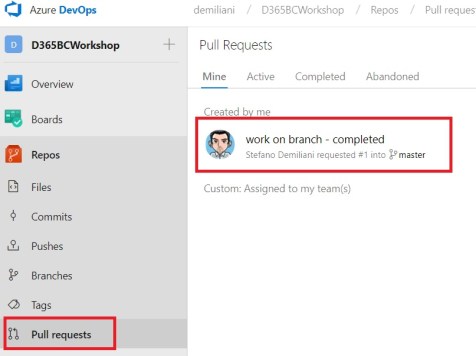
All pull requests are visible in the Pull requests page:
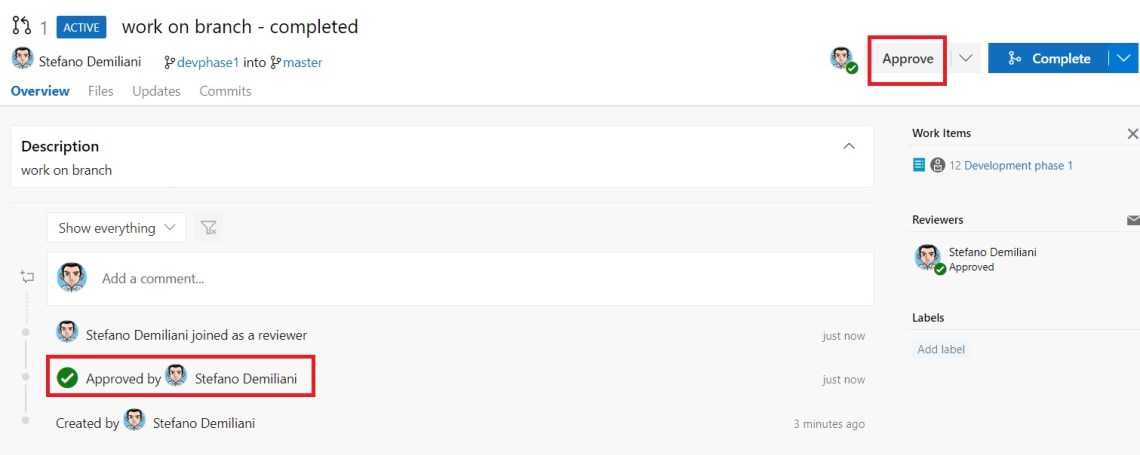
You can select a pull request, review it (see code modifications and so on) and then approve it:
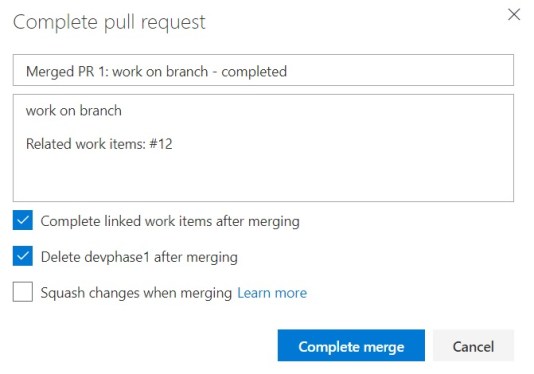
When the pull request is approved, click Complete. Now you can select to mark linked work items as completed and to delete (or not) the branch that you’re merging to the master:
Click on Complete merge to start the merging phase. When the pull request is completed, you receive a notification:

Your master branch is updated and the result is graphically displayed on Commits:

This is a quick introduction on how to manage a code lifecycle management for your Dynamics 365 Business Central development projects with Azure DevOps. As you can see, all is perfectly automated and managed by a single platform. This works with Visual Studio Code but obviously also with Visual Studio and other project types (like .NET applications etc.). The platform permits a complete team working between developers and project managers/testers/consultants in a single unified platform. I highly recommend to give Azure DevOps a try, it’s really a great tool.
With Azure DevOps you can do also other things like Pipelines, Test Plans and Artifacts, but it will be another story…

I like this post.
Please show me more details about: how to mange Project-Repos with SCM on VS Code, work in a Team.
LikeLike
What do you need more? I think all is explained. Create a repo, use branches, pull and merge them to the master one.
LikeLike
Hy im new in DevOps and MSBC365. Can i dev directly in Production and where i can save all the data bevor i publish that?
LikeLike
For developing extensions with D365BC you need to use an online sandbox or (better) a local one based on a Docker image. Then you can manually upload the .app file in the production environment.
LikeLike
Hi Demiliani,
Is there any resources which explains how we can create pipelines, CI/CD releases and publish Artifacts for Dynamics 365 BC projects. And also we needs to know what type of resources are required to do in case of Dynamics 365 BC projects.
LikeLike
Hi Demiliani,
I really like your post.
But it is mainly for developers purposes. Do you know if there is any functionalities in Azure DevOps to be used to migrate Configurations between environments? For example: migrate locations from TEST environment to PRODUCTION environment.
Of course not using manually the Config. Packages to export the data from TEST and import the same data into PRODUCTION.
Thanks,
Jose
LikeLike