


A container image is a lightweight, stand-alone, executable package of a piece of software that includes everything needed to run it: code, runtime, system tools, system libraries, settings.
I was a container user from some years, mainly for developing .NET applications for the cloud or on cross-platform environments.
I remember also that some years ago I’ve shared a document full of requests for the NAV product team and one of these was a question in order to know if a project regarding having NAV on containers was in plan for the future or not. After that, a day a man called Freddy Kristiansen comes out with the light: “we have NAV on Docker!” 🙂
Personally, actually I’m using a lot NAV on Docker containers mainly for development and demo purposes. In few minutes, you’re able to have a fully working NAV environment that runs on an isolated environment on your local system ready to go, with the NAV version (and cumulative update) you want. And you can have as many containers as you want (or as your system’s resources permits).
I’ve received questions regarding running NAV on Docker on Azure and the answer is yes, you can run the actually available NAV containers also on Azure. The easiest solution is a service called Azure Container Instances.
Azure Container Instances makes it easy to create and manage Docker containers in Azure, without having to provision virtual machines or adopt a higher-level service. An Azure Container Instance is a single container that starts in seconds and is billed by the second you use it.
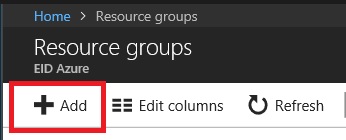
The steps are really easy. From your Azure Portal, if you’ve not yet created, create a Resource Group for your container (I recommend to create one for every instace you want to run).
Then, select Azure Container Instances and click Create:

Now, set your container name (unique for Azure Region), set the Container Image to one of the available Docker container images and set the Resource Group and the Location:

Set OS type (be careful here that the default is set to Linux, you’ve to change it to Windows) and the resources (CPU cores and RAM, and IP address) for your container and click OK:

A validation will be performed and if all is ok you’re ready to deploy your NAV container to an Azure Container Instance:

After some minutes (pulling and extracting the image takes some time), your NAV container will be provisioned on Azure Container Instance and you can see it’s status and IP address directly from the Azure Portal. To access NAV, just open the browser and navigate to http://<containerIP>/nav.
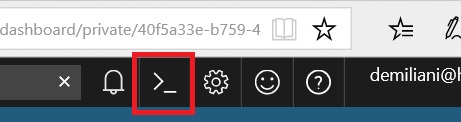
You can also immediately create a NAV Container on Azure Container Instances via the Azure CLI (and this is what I prefer because it’s the quickest way to bypass all the steps previously described). From Azure Portal, launch the Cloud Shell (CLI) from the toolbar:
Create the Resource Group:
az group create --name myNAVRG --location WestEurope
After that, you can use the az container create command to create your NAV container based on the Docker image you want:
az container create -g myNAVRG -n NAV2018CU3IT --image microsoft/dynamics-nav:2018-cu3-it --os-type Windows --cpu 2 --memory 4 --ip-address public -e ACCEPT_EULA=Y USESSL=N ClickOnce=Y publicDnsName=NAV2018CU3IT.westeurope.azurecontainer.io --dns-name-label NAV2018CU3IT --ports 80 7046 8080
This command creates a NAV container based on the NAV 2018 CU3 Italian image using 2 core and 4 GB of RAM.
The --dns-name-label value must be unique within the Azure region you create the instance.
P.S. If you want to create the NAV container and uploading your Development License, you need to add this parameter in the environment variables:
-e ACCEPT_EULA=Y USESSL=N LICENSEFILE=c:\myfolder\license.flf
Obviously, the folder where you place the NAV license file must be accessible from Azure.
User and Password for connection to your just deployed container can be found on the log by using this command:
az container logs --resource-group myNAVRG --name NAV2018CU3IT
You can have a list of all your available containers on Azure Container Instance (for a Resource Group) with the following command:
az container list --resource-group myNAVRG --output table
To delete the previously created container, execute the following command:
az container delete --resource-group myNAVRG --name NAV2018CU3IT
As you can see, easy and very very productive…

Hey Stefano,
thanks for this post!
I’ve been able to get the Web Client and AL development successfully running as a container instance.
As an aside: I used the mcr.microsoft.com/businesscentral/onprem:cu5-de-ltsc2016 image since ltsc2019 seems to have problems as of now.
One question: Is it possible to connect via C/SIDE and RTC as well? If so, how would it be done?
Cheers,
Andy
LikeLike