

One of the quite common scenarios that I often see in many Dynamics 365 Business Central projects is something like the following:
- A business process inside the ERP generates a data table with the result of a data processing or a statistical calculation.
- The result of the business process must be exported in an Excel file saved into Onedrive or Sharepoint for the current user.
Doing that it’s quite easy with a Power Automate flow. For this example, imagine that I want to periodically export the Customer table into an Excel file saved in the user’s Onedrive folder. We can create a flow like the following to achieve our goal:
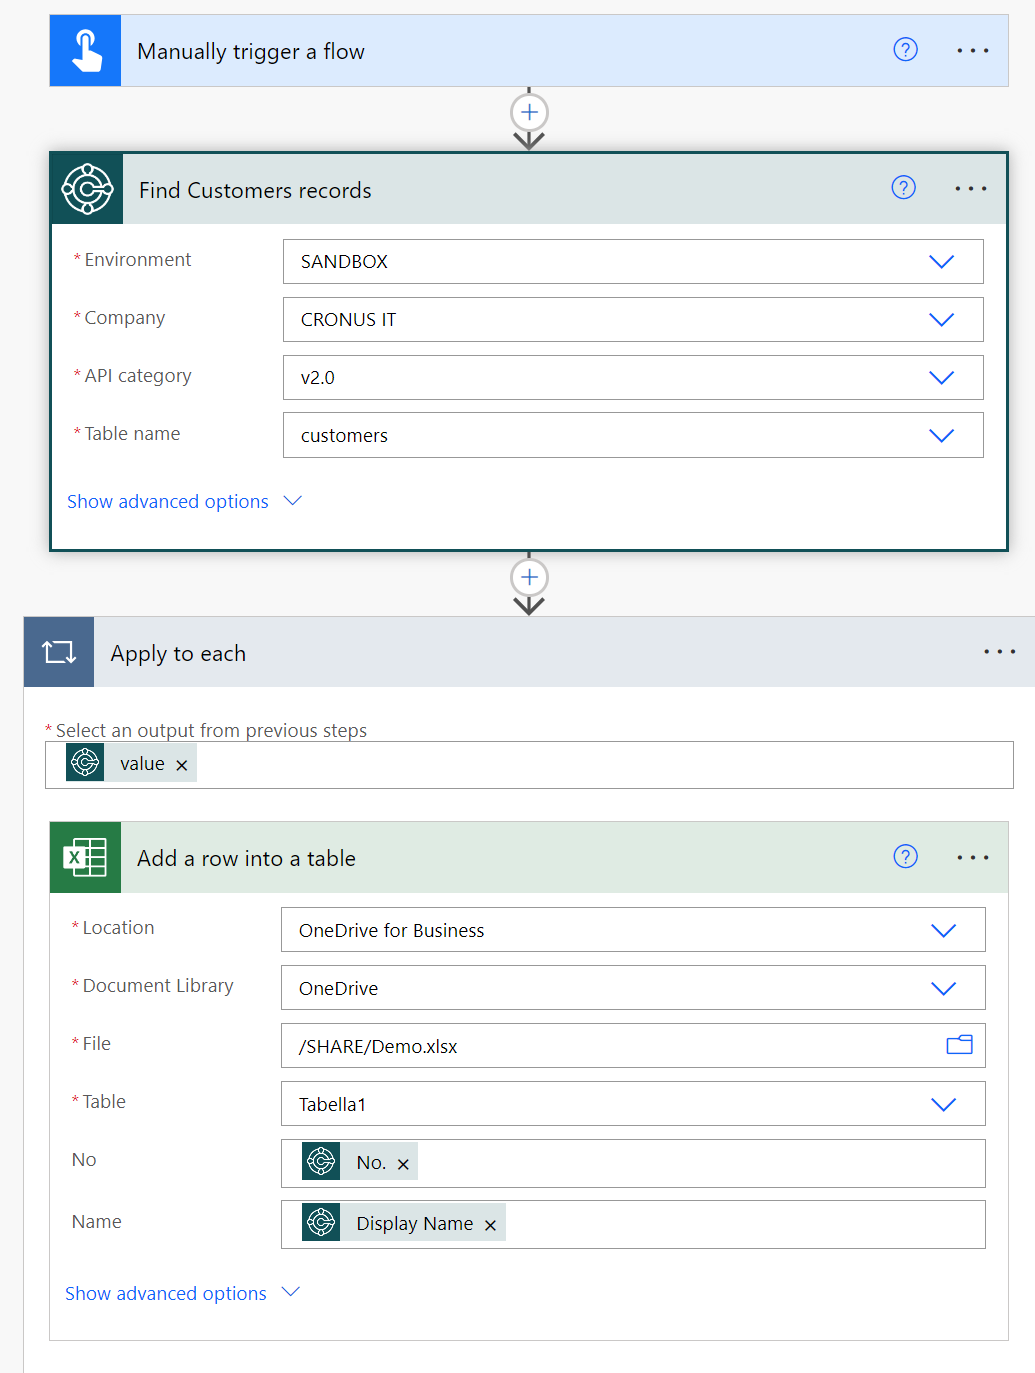
In this flow I’m retrieving the Dynamics 365 Business Central records using the Find Record action, then for each retrieved records I use the Add a row into a table action of the Excel connector to add the data (No. and Display Name of the Customer record) to a table in the Excel file (my demo Excel file has a table with two columns called Customer No and Customer Name, but imagine something more complex than this):

This solution is what I usually see proposed to customers by a lot of Power Automate consultants. Low-code, easy and quick to implement. Testing works, customer and consultant are happy 🙂 . But after the demo/testing period, there’s a time where this flow must be placed into production. And here things could change…
If you have about 100 of Customer records into your Dynamics 365 Business Central environment, this workflows runs for some minutes and then it completes successfully. But what happens if the number of records increases and you need to export a lot more records? With about 500.000 records or more for example, this workflow can run for hours! And this could be a big problem…
The limit here is that the Excel connector for Power Automate has actions to process records by rows. We need to loop through each of the retrieved records and perform actions in Excel. And heavy loops in Power Automate are not friends of the word “performance“.
What can we do to increase performances of this flow?
When working with large Excel files from Power Automate and you want performances, the solution is: Microsoft Graph APIs.
Microsoft Graph is the gateway to Microsoft 365. The Microsoft Graph API offers a single endpoint (https://graph.microsoft.com) to provide access to rich, people-centric data and insights in the Microsoft cloud, including Microsoft 365, Windows, and Enterprise Mobility + Security. You can use REST APIs or SDKs to access the endpoint and build apps that support Microsoft 365 scenarios, spanning across productivity, collaboration, education, people and workplace intelligence, and more. Microsoft Graph also includes a powerful set of services that manage user and device identity, access, compliance, and security and help protect organizations from data leakage or loss.
To achieve performances, we need then to change our flow by using Graph APIs instead of using the Excel connector. More in details, we need to use the Graph’s Create Row API.
Here is an example of request:
POST https://graph.microsoft.com/v1.0/me/drive/items/01CCETFLK7GVZTZHSQNRD2AEI5XWTCU6FJ/workbook/tables/Table1/rows
Content-type: application/json

{
  "values": [
    [1, 2, 3],
    [4, 5, 6]
  ]
}
To use Graph APIs, we need to register an application into Microsoft Entra in order to retrieve a token. I don’t want to repeat all the process here. The process is always the same as you do for handling authentication with Dynamics 365 Business Central APIs. The only difference is that when you add permissions for the app registration you need to select Microsoft Graph and then Application Permissions:

And then you need to scroll through the list of permissions, select the Sites group and here select Sites.Read.All and Sites.ReadWrite.All (required to access Onedrive):

You then need to create a secret and save its value.
To use the Graph API we need to have:
- the tenant id
- the client (application) id
- the client secret
The second version of our Power Automate flow that uses Graph API instead of the Excel connector can be defined as follows:

Here, we retrieve Customer records from Dynamics 365 Business Central by using the Find Records action (as before) and then we use the Select action to transform the array of Business Central records returned by the Find Records action to a new array of values. The element of this new array must be between [] and must contain the values for each column in the Excel file, with comma separing that values (as explained in the Graph API specification). You can omit a column value by using “” and you can also insert formulas in a cell by using the = operator.
After the Select action, we have a JSON containing the array of the record to insert. This is the body of the Graph API that we need to call.
To call the Create Row API we need to use the HTTP connector and perform a POST request with that JSON body. Here is the detail of the HTTP action:

In this action I’ve omitted the values of some parameters. More in details:
- USERID: is the user id of the user where you want to save the Excel file. This GUID can be retrieved from https://admin.microsoft.com/ (just clikc on the user and in the url you can find its ID).
- PATH_TO_FILE is the path where the file is stored in Onedrive. You can retrieve it in the property of the file in Onedrive.
- TABLENAME: the name of the table in your Excel file (in my demo it’s Tabella1).
Please note that in the Headers you need to add the Accept: application/json parameter.
The body of the POST request must be the following JSON:
{
"index":null,
"values": OUTPUT_OF_THE_SELECT_ACTION
}
where values is the dynamic output of the Select action (see image above).
You also need to click on the Advanced section and fill the authentication parameters as follows:

Here:
- Authentication must be set to Active Directory OAuth.
- Authority: set to https://login.microsoftonline.com
- Tenant: insert your tenant i
- Audience: set to https://graph.microsoft.com
- Client ID: set to your application registration ID in Microsoft Entra.
- Credential Type: set to Secret.
- Secret: insert your previously created secret for the app registration.
What happens now?
If you execute this flow with a large amount of records (for example the previously mentioned 500.000 records) the flow will be executed in some minutes instead of hours!!
This is a chart showing the big difference between the two solutions when the flow is executed with a very large amount of data (500K records):

The first flow processes 500K records in about an hour, the second solution always in less than 2 minutes!
I agree that with this second option there’s a bit more of technical work to do and probably an API expert is required (just someone that know about Entra ID and Graph APIs) but at the end the result is a tremendous improvement in terms of performances.
This post has a main goal: helping to understood that Power Automate is powerful to automate tasks, it has a lots of connectors available but sometimes if you want to have performances, you need to do something different than simply using a built-in connector. The Graph API approach in this scenario helps a lot on increasing the performance of your flow, simply because in this way you’re sending requests in bulk to Excel instead of realying on the standard Excel connector (that don’t support bulk requests).
Low-code is great, but sometimes a bit of coding can make the difference…
I have more advanced scenarios about this topic on different areas, so expect more on this soon (and at Directions EMEA in Lyon if you’re a workflow passionate I will show you something magical about workflow performances in my Azure Logic Apps section).

Hello Stephano,
At what moment, the excel file is created in the second flow ? Is supposed to be created manually in the OneDrive before the Graph populate it?
Thank youn
LikeLike
Yes in this sample the file is an empty Excel file with a table that must be populated later from the flow.
LikeLike
Sorry for the test comment,
I am a new user of Power Automate. I have followed your steps in this article and I am getting an error on the HTTP action. I believe my problem is the file path in onedrive. Can you please provide more detail on excatly what the path should be as I do not see the properties section available in any version of the document (opened in OneDrive, locally, etc.). I have tried the sharing link, the URL from the file opened in Excel Web and neither work.
Also, can you please clarify what the table name should be. Is this the name of the Excel sheet or do I have to actually name the table?
Here is the detail of the error I am receiving, Thanks for your help.
{
“statusCode”: 400,
“headers”: {
“Transfer-Encoding”: “chunked”,
“Vary”: “Accept-Encoding”,
“Strict-Transport-Security”: “max-age=31536000”,
“request-id”: “fce8d540-0d93-4ed7-ab69-a168ce9950b7”,
“client-request-id”: “fce8d540-0d93-4ed7-ab69-a168ce9950b7”,
“x-ms-ags-diagnostic”: “{“ServerInfo”:{“DataCenter”:”West US”,”Slice”:”E”,”Ring”:”4″,”ScaleUnit”:”003″,”RoleInstance”:”SJ1PEPF00002467″}}”,
“Date”: “Thu, 05 Sep 2024 22:16:48 GMT”,
“Content-Type”: “application/json”,
“Content-Length”: “277”
},
“body”: {
“error”: {
“code”: “BadRequest”,
“message”: “Resource not found for the segment ‘root:uneedaenterprizes-my.sharepoint.com’.”,
“innerError”: {
“date”: “2024-09-05T22:16:48”,
“request-id”: “fce8d540-0d93-4ed7-ab69-a168ce9950b7”,
“client-request-id”: “fce8d540-0d93-4ed7-ab69-a168ce9950b7”
}
}
}
}
LikeLike
This may provide some more information.
400
{ “Transfer-Encoding”: “chunked”, “Vary”: “Accept-Encoding”, “Strict-Transport-Security”: “max-age=31536000”, “request-id”: “ffa63500-5c86-4296-a5b0-2ecbbb63a3df”, “client-request-id”: “ffa63500-5c86-4296-a5b0-2ecbbb63a3df”, “x-ms-ags-diagnostic”: “{“ServerInfo”:{“DataCenter”:”West US”,”Slice”:”E”,”Ring”:”4″,”ScaleUnit”:”005″,”RoleInstance”:”SJ1PEPF00001C9F”}}”, “Date”: “Mon, 09 Sep 2024 21:59:00 GMT”, “Content-Type”: “application/json”, “Content-Length”: “247” }
{ “error”: { “code”: “BadRequest”, “message”: “Resource not found for the segment ‘root:https’.”, “innerError”: { “date”: “2024-09-09T21:59:01”, “request-id”: “ffa63500-5c86-4296-a5b0-2ecbbb63a3df”, “client-request-id”: “ffa63500-5c86-4296-a5b0-2ecbbb63a3df” } } }
LikeLike
Path should be in the format /FOLDER/FileName.xlsx
You can call Graph API to list all your existing files in Onedrive:
https://learn.microsoft.com/en-us/graph/api/driveitem-list-children?view=graph-rest-1.0&tabs=http
LikeLike
Thanks. But still not working. Here is the string I am using.
https://graph.microsoft.com/v1.0/users/<USERNAME>/drive/root:Documents/Customer.xlsx:/workbook/tables/table1/rows/add
The error I am getting is:
Action ‘HTTP’ failed: Resource not found for the segment ‘root:Documents’.
What am I doing wrong?
Also, should the username in the string be my email address or the GUID?
4ac23d7e-917c-44f3-9ebe-xxxxxxxxxxxx
LikeLike
There is a limit of 1000 rows of exporting from BC… Any solution to that?
LikeLike
There’s a limit of 5000 records for a BC APIs, then you need to handle paging for retrieving the other records.
LikeLike