


In many Microsoft Dynamics NAV implementations we have situations where the NAV database is often “coupled” with a second database for business intelligence processing or other data manipulations/analysis. Often we use this scenario for handling Power BI data warehouses in the cloud (Azure SQL) that work by using data that comes from NAV, external sources, IoT devices and so on.
In these scenarios, data must be synched between the NAV database and the cloud-based database and for handling this task we often use custom scripts that performs data transfer and/or data loading from target source to the destination database.
To handle these tasks, now we have also an interesting service that comes from the Azure platform: SQL Data Sync. This is a new service built on Azure SQL Database that lets you synchronize the data you select bi-directionally across multiple SQL databases and SQL Server instances.
SQL Data Sync uses a hub and spoke topology to synchronize data. You define a Sync Group (a group of databases that you want to synchronize), define one of the databases in the group as the Hub Database and the other databases are member databases. The syncronization process occours only between the Hub and individual members.
- The Hub Database must be an Azure SQL Database.
- The member databases can be either SQL Databases, on-premises SQL Server databases, or SQL Server instances on Azure virtual machines.
- The Sync Database contains the metadata and log for Data Sync. The Sync Database has to be an Azure SQL Database located in the same region as the Hub Database. The Sync Database is customer created and customer owned.
To use SQL Data Sync in order to sync data from your on-premise NAV database to an Azure SQL database, you can do as follows.
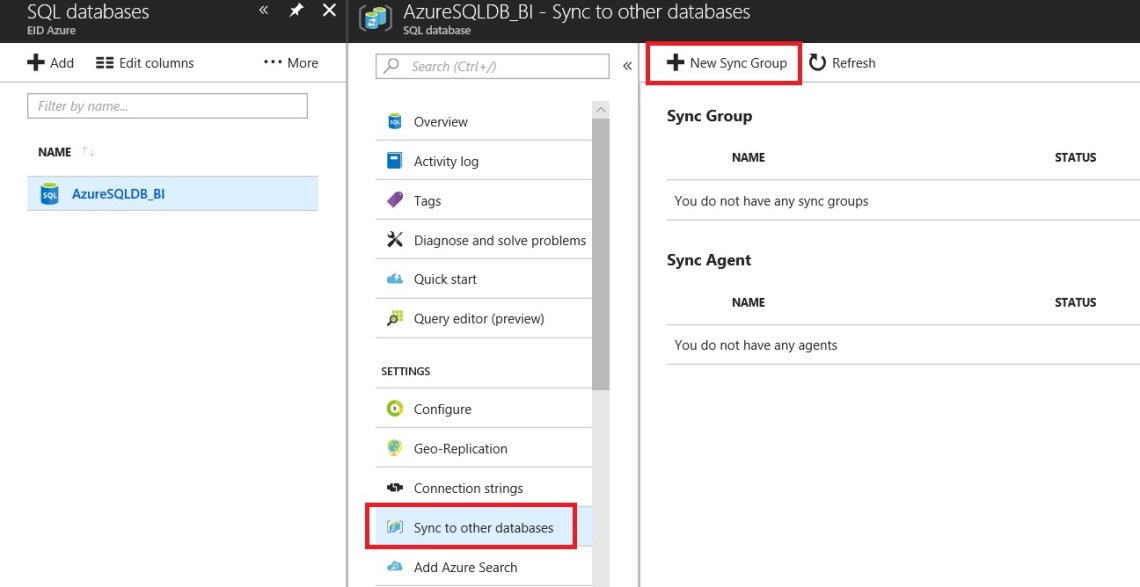
From the Azure Portal, select your Azure SQL Database that acts as the Hub (the target of the data sync), select Sync to other databases and create a New Sync Group:
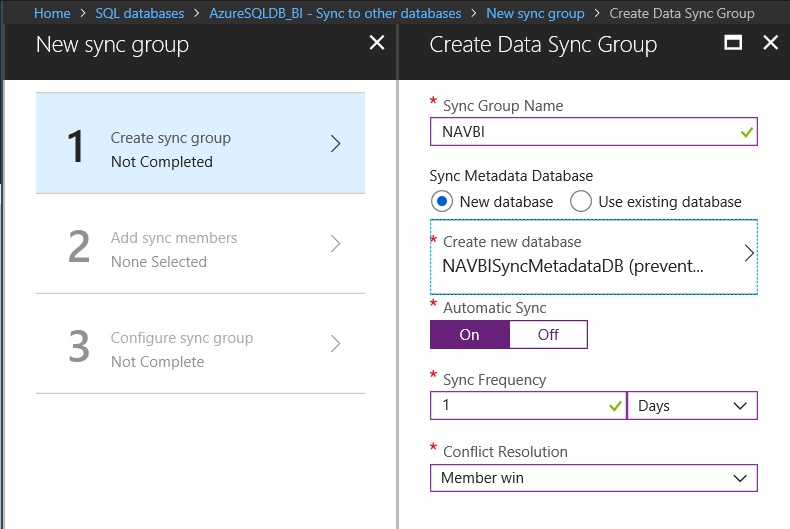
In the New sync group page, set a Sync Group name and in the Sync Metadata database section create a new metadata database for the sync process. Then, you can set to enable Automatic Sync (On), set the Sync Frequency and set the Conflict Resolution policy with the following values:
- Hub wins: when a conflict occurs, the data in the hub database overwrites the conflicting data in the member database.
- Member wins: when a conflict occurs, the data in the member database overwrites the conflicting data in the hub database.
Here, I select Member Wins because I want that NAV data wins in case of data conflict with the cloud database:
Click OK and the Sync Group will be deployed.
After that, select Add sync members and then Add an On-Premises Database (because we want to sync with our NAV on-premises database):
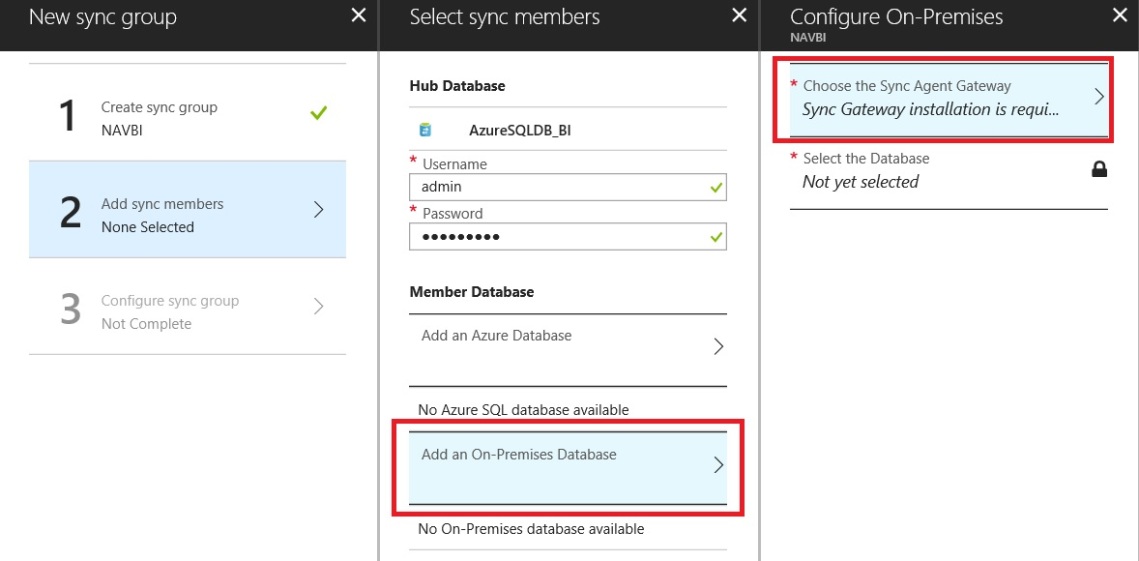
In the Configure On-Premises page, select Choose the Sync Agent Gateway and then click on Create a new agent. Here:
- Download the client sync agent software from the link provided and install it on the computer where the SQL Server on-premise NAV database is located (probably you have to open outbound TCP port 1433 in the firewall to let the client agent communicate with the server)
- Select the name for your Sync agent, click Create and Generate Key and copy this key:

Now, on your on-premise NAV server (SQL Server machine) where you have downloaded the client Sync Agent application, run it and select Submit Agent Key:

The Sync Metadata Database Configuration dialog box opens and here paste in the agent key copied from the Azure portal and provide the existing credentials for the Azure SQL Database server on which the metadata database is located:

At this point, you could have a firewall error. If so, create a firewall rule on Azure to allow incoming traffic from the local SQL Server computer.
Now, in the Sync Agent application click on Register and enter the details and credentials of your on-premise NAV database:

Now, go back to the Azure Portal and in the Configure On-Premises page, select Select the Database. Here, in the Sync Member Name field, provide a name for the new sync member. In On-premises databases connected to this agent, select the database from the list. In the Sync Directions field, select Bi-directional Sync, To the Hub, or From the Hub.
Here I’ve selected To the Hub because I want that my data sync goes from NAV to the cloud database:

Now wait for the new Sync Member to be created and deployed and your data sync is configured. You can now select the Configure Sync Group section and here select which tables and fields you want to syncronize from NAV to the Azure SQL database (by default, all columns in the table are selected).
Nice and clean 🙂

Hi
we have Microsoft Dynamics NAV 2013 and want to do exactly what you describe here. Move/sync relatively few (~20) tables from the NAV DB to an Azure DB and then use that data to do BI analysis.
I am however told there is a 500 table hard limit on Azure sync so it will not work with a Navision database?
LikeLike
True. You can sync up to 30 databases (five on-premises SQL Server databases) in a single sync group, and up to 500 tables in any database in a sync group. There are tricks to avoid this built-in limit:
https://azure.microsoft.com/en-us/blog/sync-sql-data-in-large-scale-using-azure-sql-data-sync/
LikeLike
Thus even if Navision has several thousand tables it is no problem to use Azure Sync to sync 20 tables to an Azure DB?
LikeLike
Hi Stefano, thanks for the article.
If I already have a large database in Azure (more than 500 tables), it seems I can only sync a few tables from the production sql server instance. If this it the case, how does the sync work? Will only the tables that I am syncing be updated and rest are left alone?
I want to use these few tables for Power BI.
Thank you
LikeLike
You can select the tables you want to sync. All other tables are not synched.
LikeLike
Thanks for your reply.
I am trying to sync a few tables from NAV to Azure. I have followed all the steps but am not able to select which tables to sync. This is because when I click ‘refresh schema’ (on Azure Portal) to show me available tables in member database, it says there are too many tables to display.
Could you please tell me how I can work around this?
LikeLike
this is the error:
Getting schema information for the database failed with the exception “Unable to process a schema with 5338 tables, 500 is the max For more information, provide tracing ID ‘e1f68119-372f-4d78-aeee-6b74ae02b06b’ to customer support.”
LikeLike